

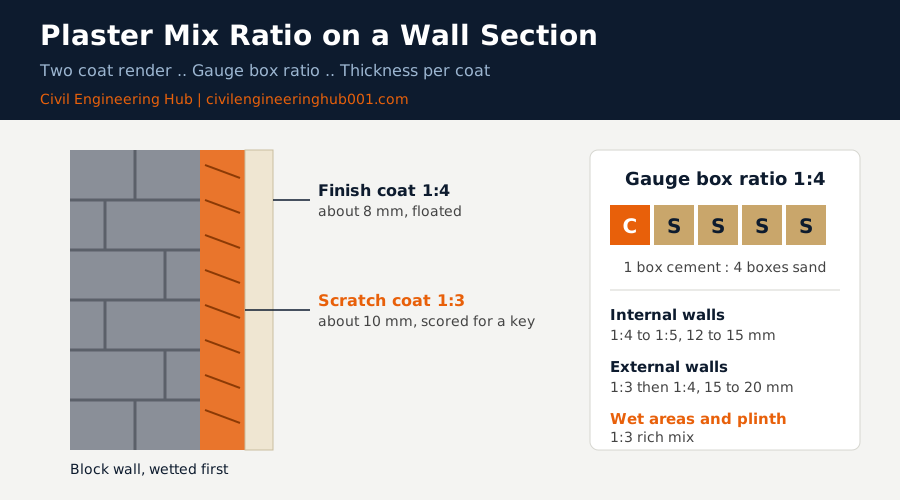
The correct mix ratio for plaster depends on where it goes. For most internal walls in Kenya, a 1:4 cement to sand mix by volume works well, while external walls usually need a richer 1:3 first coat followed by a 1:4 finishing coat.
The truth is, most plaster failures are not caused by bad workmanship alone. They come from the wrong ratio, dirty sand, or too much water added by a mason who wants the mix to spread more easily.
Every trade on site touches this decision. The mason mixes it, the foreman checks it, the quantity surveyor prices it and the engineer specifies it. When one of them guesses, the client ends up with cracked, hollow or powdery walls within a year.
In this guide you will learn the standard ratios, how to match them to each surface, how to measure with a gauge box, how much cement and sand you need per 100 square metres, and the mistakes that ruin good plaster.
Quick Answer: Use a 1:4 cement to sand mix (by volume) for internal wall plaster and a 1:3 first coat with a 1:4 second coat for external walls. Always use clean, well graded sand and only enough water for workability, never extra.
What does a plaster mix ratio actually mean on site?
A ratio of 1:4 means one part cement to four parts sand, measured by volume and not by weight. Cement is sold by weight, but a 50 kg bag fills roughly 35 litres, so most sites make a gauge box of that size. One box of cement, four boxes of sand, and the ratio is under control.
In simple terms, the ratio tells you how rich the mix is. A 1:3 mix has more cement, so it is harder, denser and more water resistant. A 1:6 mix has less cement, so it is softer, cheaper and more forgiving.
Richer is not always better. Strong mixes shrink more as they dry, and that shrinkage shows up as map cracking. The golden rule in plastering is that each coat must be no stronger than the coat or wall behind it, otherwise the plaster pulls itself off the surface.
The reference standards are BS EN 13914-1 for external rendering and BS EN 13914-2 for internal plastering, with BS EN 998-1 covering factory made rendering mortars. On Kenyan sites the cement is normally a 42.5N grade to KS EAS 18-1, and your project specification and BOQ preambles should state the mix required.
Which plaster mix ratio should you use for each surface?
The right mix changes with the exposure and the background. Use this table as a starting point, then confirm against your specification.
| Surface | Mix (cement:sand) and thickness | Site notes |
|---|---|---|
| Internal walls, sandcrete or hollow blocks | 1:4 to 1:5, 12 to 15 mm | Use 1:5 on softer blocks; one or two coats |
| Internal ceilings, concrete soffit | 1:3, 6 to 10 mm | Brush the soffit and apply a bonding coat first |
| External walls | 1:3 first coat, 1:4 second coat, 15 to 20 mm total | Scratch the first coat to give the second a key |
| Bathrooms and kitchens | 1:3, 12 to 15 mm | Add a waterproofing admixture as the manufacturer directs |
| Plinth and walls below DPC | 1:3, 15 to 20 mm | Constant moisture, so keep the mix rich and well compacted |
Notice the pattern. The wetter and more exposed the location, the richer the mix. The drier and more protected the location, the leaner it can be.
Some artisans in Nairobi and Nakuru add hydrated lime, for example 1:1:6 cement to lime to sand. The lime improves workability and reduces cracking, but it must be measured properly and approved in the specification.
Background matters just as much as the ratio. Smooth concrete and dense machine cut blocks have low suction, so they need a bonding slurry or a spatterdash coat. Porous stone or burnt brick has high suction, so wet it well before plastering or it will pull water out of the mix before it can bond.
Honestly, a perfect 1:4 mix on a dry, dusty wall will still fail. Surface preparation is half the job.
How does sand quality change the plaster result?
Sand makes up four fifths of a 1:4 mix, so poor sand ruins plaster faster than poor cement. Plastering sand should be clean, sharp, well graded and pass a 4.75 mm sieve, with no clay lumps, roots or salt.
A quick site test is the jar test. Half fill a clear jar with sand, add water and shake. Let it settle for an hour. If the silt layer on top is thicker than about 6 to 8 percent of the sand depth, wash the sand or reject it.
Remember bulking. Damp sand can swell by up to 25 percent in volume, so a gauge box of wet sand holds less real sand than a box of dry sand. If you do not allow for it, the mix turns out richer in cement than intended, and it will shrink and crack.
The table below shows the sand problems we see most often on Kenyan sites.
| Problem | How to spot it | Effect on plaster |
|---|---|---|
| Silty or clay sand | Muddy water in the jar test, sticky feel | Weak bond, powdery surface, shrinkage cracks |
| Very fine sand | Feels like flour, no gritty feel | High water demand, heavy cracking |
| Very coarse sand | Large grains, hard to trowel | Rough finish, poor workability |
| Salty sand (coastal) | White crust on dried sand | Efflorescence, rusting of embedded steel |
| Organic matter | Dark colour, plant material | Slow setting, soft patches |
Water must be clean and fit for drinking. Add it slowly, because every extra litre weakens the mix. Stop when the mortar sticks to the trowel without slumping off it.
How much cement and sand do you need per 100 square metres?
This is where the QS and the foreman should agree before the first bag is opened. For a 12 mm coat, one square metre needs 0.012 cubic metres of wet mortar. Dry materials take about 1.3 times that volume, and adding 10 percent for waste gives roughly 0.017 cubic metres per square metre, or 1.7 cubic metres per 100 square metres.
Taking cement at 1,440 kg per cubic metre, the quantities per 100 square metres at 12 mm thick are shown below.
| Mix | Cement (kg) | Cement (50 kg bags) | Sand (m3) |
|---|---|---|---|
| 1:3 | 612 | 12.2 | 1.28 |
| 1:4 | 490 | 9.8 | 1.36 |
| 1:5 | 408 | 8.2 | 1.42 |
| 1:6 | 350 | 7.0 | 1.46 |
Scale up for thicker coats. A 20 mm external coat needs about 1.7 times these figures. Always confirm against a trial area, because sand quality and mason habits change real consumption.
What are the steps to mix and apply plaster correctly?
Good plaster is a process, not a single action. Follow these steps in order and check each one before moving on.
| Step | Action and site check |
|---|---|
| 1. Prepare the wall | Remove dust, grease and loose mortar. Wet the wall until damp but not dripping. |
| 2. Set the guides | Fix screed strips or plaster dots every 1.5 to 2 metres. Check plumb with a spirit level. |
| 3. Batch the dry mix | Use the gauge box. Turn cement and sand together at least three times until the colour is even. |
| 4. Add water slowly | Mix until the mortar sticks to the trowel without slumping. |
| 5. Apply and compact | Throw or trowel the mix firmly onto the wall, filling between the guides. |
| 6. Level off | Pull a straight edge across the guides in an upward zigzag, then fill any hollows. |
| 7. Scratch or float | Scratch the first coat of external work. Float the final coat once the shine has gone. |
| 8. Cure | Keep damp for at least three days, ideally seven, and shield from direct sun and wind. |
What common mistakes ruin plaster, and how do you avoid them?
Almost every plaster defect traces back to a short list of mistakes. The truth is they are cheap to prevent and expensive to repair.
| Mistake | What happens | How to prevent it |
|---|---|---|
| Counting shovels instead of using a gauge box | Ratio varies by batch, patchy colour and strength | Use one fixed size gauge box for every batch |
| Adding too much water | Weak, dusty plaster with shrinkage cracks | Add water slowly and stop at workable consistency |
| Plastering a dry wall | Wall sucks water out, plaster sounds hollow | Wet the wall evenly before the first coat |
| Skipping curing | Surface cracks and dusting within days | Keep damp for three to seven days |
| Strong mix on a weak block | Plaster cracks along block joints | Match mix strength to the background |
| Re-tempering old mortar | Poor bond and low strength | Use each batch within about two hours and discard stale mortar |
For the quantity surveyor and project manager, these defects matter because rework is rarely recoverable from the client. One hollow wall means hacking off, replastering and repainting, and that cost lands on the contractor.
Frequently Asked Questions
Q: Can I use a 1:6 mix for plastering internal walls?
Yes, a 1:6 mix can be used for internal plaster on soft blocks or stock bricks, provided the sand is clean and well graded. It is weaker and more porous, so avoid it in bathrooms, kitchens and any wall that will get wet. Always confirm with the engineer or the specification before using it.
Q: How thick should plaster be?
Internal plaster is normally 12 to 15 mm thick, while external plaster is 15 to 20 mm applied in two coats. Going thicker than 20 mm in one pass leads to sagging and cracking. If a wall is badly out of plumb, correct it in layers and let each one stiffen before the next goes on.
Q: Why does my plaster crack after a few days?
The common causes are too much cement, too much water, fine silty sand and poor curing. Plaster applied in hot, windy conditions dries too fast, so shade the work and keep it damp. Cracks that follow block joints usually point to movement in the wall, not a mix problem.
Conclusion
The correct plaster mix ratio is the one that matches the surface: 1:4 to 1:5 inside, 1:3 then 1:4 outside, and 1:3 where moisture is a constant threat. Control it with a gauge box, check your sand with a jar test, add water carefully and cure the work.
When the mason, foreman, QS and engineer all work to the same ratio, you get a wall that looks good, takes paint well and lasts for decades. Share this guide with your site team before the next plastering gang starts.
Want more practical construction knowledge delivered directly to you?
Subscribe to our YouTube channel: https://www.youtube.com/@TheCivilEngineeringHub-001
PS: Join our engineering WhatsApp community for daily learning at +254731393520