

Getting mortar wrong is one of the fastest ways to weaken a wall that looks perfectly fine on the day it goes up. So how do you mix mortar correctly for bricklaying? In simple terms, it comes down to the right cement-to-sand ratio for the job, controlled water content, and proper curing after laying.
Honestly, most site failures with mortar do not come from bad materials. They come from guesswork. A mason mixes “by eye,” the ratio drifts from batch to batch, and six months later you have cracked joints, damp patches, or a wall that crumbles at the touch. This post breaks down the exact ratios you should be using, why they matter structurally, and how to avoid the mistakes that cost money down the line.
Quick Answer: For most bricklaying work in Kenya, use a 1:6 cement-to-sand mix ratio for general walling, 1:4 for load-bearing or exposed brickwork, and 1:3 for high-strength or below-ground work, measured by volume with clean sand and just enough water to make the mix workable without being runny.
What Mortar Actually Does in a Wall
Mortar is not glue. That is the first thing every mason and every civil engineering student needs to understand. Its job is to bed the blocks or bricks evenly, transfer load uniformly across the wall, and absorb small movements without cracking.
That means mortar needs to be slightly weaker than the blocks or bricks it holds together, not stronger. If you use a mortar mix that is too rich in cement, the mortar becomes harder than the masonry unit itself. When the wall moves slightly due to temperature change or settlement, the crack will not appear in the mortar joint where it is easy to repair. It will appear through the block, which is a much bigger problem.
This is the classroom theory that site teams often skip, and it is exactly why over-strong mixes are a real issue, not just a technicality.
The Standard Mortar Mix Ratios by Job Type
Different parts of a building carry different loads and face different exposure conditions, so the mix ratio should change accordingly. Below is a practical reference table used widely on Kenyan sites and aligned with general masonry mortar guidance under BS 5628.
| Application | Cement : Sand Ratio | Typical Use |
|---|---|---|
| General block walling (non-load-bearing) | 1:6 | Internal partition walls, boundary walls |
| Load-bearing masonry | 1:4 | External walls, ground floor walls carrying slab load |
| High-strength / below-ground | 1:3 | Foundation walling, retaining walls, damp-prone areas |
| Plaster backing coat | 1:5 | Preparing a wall surface before finishing plaster |
| Pointing and repair work | 1:2 to 1:3 | Repointing old brickwork, small repairs |
The truth is, many masons use one mix ratio for everything on site because it is faster. That habit is where long-term wall problems start. A 1:6 mix is fine for an internal partition. It is not fine for a foundation wall sitting below ground level and facing constant moisture.
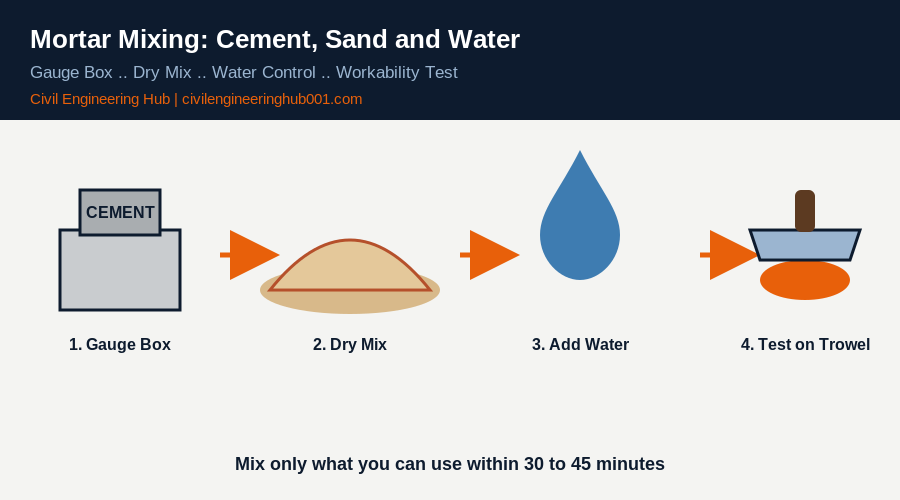
Cement, Sand, and Water: Getting the Proportions Right on Site
Ratios only work if the measuring is consistent. This is where a lot of sites lose control, because gauge boxes get ignored and mortar is mixed by headcount of wheelbarrows instead of volume.
Here is the practical method:
- Use a gauge box sized to one bag of cement (50 kg bag equals roughly 0.035 cubic metres) so your sand quantity is always measured against a fixed cement volume.
- Mix dry materials first, cement and sand, until the colour is uniform throughout the pile.
- Add water gradually, mixing continuously, until the mortar holds its shape on a trowel without dripping.
- Test workability by pressing a small ball of mortar in your palm. It should hold together without crumbling and without oozing water.
- Mix only what you can use within 30 to 45 minutes. Mortar that starts to stiffen should never be re-tempered with more water.
Water content matters more than most site teams realize. Too much water weakens the final strength significantly, even if the cement-to-sand ratio was correct to start with. Too little water gives you a stiff mix that does not bond properly to the block face, leaving voids that show up later as damp lines or hollow-sounding joints.
Common Mortar Mixing Mistakes That Weaken a Wall
A few habits repeat themselves across sites, and they are worth naming directly.
Mixing mortar too rich because “stronger is better” is the most common one. As explained earlier, over-strong mortar transfers cracking into the block instead of the joint. This is counterintuitive to many artisans, so it is worth explaining clearly to your team rather than assuming they already know it.
Using dirty or unwashed sand is another frequent issue. Silt and clay content in sand interferes with the cement bond and reduces final strength. A simple site test: place a handful of sand in a clear bottle of water, shake it, and let it settle. If the silt layer on top exceeds about 6mm out of a 50mm sand column, the sand needs washing or should be rejected.
Retempering old mortar with extra water once it has started setting is also common on hot afternoons when mortar stiffens fast. This destroys the strength gain that was already happening in the mix and should never be allowed.
Finally, inconsistent gauging between batches, one wheelbarrow of sand to one bag of cement in the morning, then two wheelbarrows by afternoon because the team is rushing, is what causes visible colour and strength variation across a single wall.
There is also the mistake of mixing mortar on bare, unswept ground. Soil, dust, and old debris get folded into the mix without anyone noticing, and that contamination lowers bond strength in ways that are impossible to detect until the wall is already up. A clean mixing platform, whether a mixing board or a swept concrete slab, should be non-negotiable on every site, no matter how small the job is.
Supervisors should also watch for masons who eyeball proportions using headpans instead of a fixed gauge box. It seems faster in the moment, but the truth is that unmeasured mixing is where most of the ratio drift on a wall actually starts. A five-minute investment in a proper gauge box saves far more time later in repairs and rework.
How Mortar Class Relates to Building Standards
Under BS 4551, mortar is tested and classified by compressive strength, and the Kenya Building Code references similar masonry mortar strength classes for structural compliance. Knowing the class your project calls for helps you choose the right ratio instead of relying on habit.
| Mortar Class | Approx. 28-Day Strength | Typical Cement:Sand Ratio | Common Application |
|---|---|---|---|
| Class I | 11 N/mm2 | 1:3 | High-strength structural masonry |
| Class II | 4.5 N/mm2 | 1:4 to 1:5 | General load-bearing walls |
| Class III | 2.5 N/mm2 | 1:6 | Non-load-bearing walls, partitions |
| Class IV | 1.0 N/mm2 | 1:8 | Low-stress, non-structural work |
For NCA-registered projects and any structural drawing that specifies a mortar class, the specification takes priority over site habit. If a structural engineer has called out Class II mortar on the drawing, that is not optional, regardless of what ratio the site is used to.
Curing and Protecting Fresh Mortar Joints
Mixing the right ratio is only half the job. Mortar needs moisture to cure properly, just like concrete does. In Kenya’s hot and often windy conditions, freshly laid brickwork can dry out within hours if left unprotected, which stops the hydration process before the mortar reaches its design strength.
Damp hessian or polythene sheeting over freshly laid courses for the first 24 to 48 hours makes a real difference, especially during the dry season. On exposed sites, light water spraying twice a day for three days is a simple habit that protects the investment already made in getting the mix right.
Direct sun and wind are the two biggest enemies of a fresh mortar joint. On an exposed boundary wall or a gable end catching afternoon sun, moisture can be pulled out of the joint before the cement has had a real chance to hydrate. That is why experienced masons schedule exposed brickwork for early morning where possible, and cover completed sections before leaving site for the day. It is a small habit, but it protects weeks of work from a single hot afternoon.
Frequently Asked Questions
Q: Can I use the same mortar ratio for blocks and bricks?
Generally yes, the same cement-to-sand ratios apply to both blockwork and brickwork, since the mortar’s job, bedding and load transfer, is the same either way. The difference comes in joint thickness, which is usually thinner for bricks than for blocks. Always match the ratio to the load and exposure condition of that specific wall, not the material type alone.
Q: What happens if I add too much cement to make the wall stronger?
Over-strong mortar becomes harder than the blocks themselves, which forces any cracking from movement or settlement to pass through the block instead of the joint. This is more expensive and harder to repair than a hairline crack in mortar. Stick to the ratio specified for that wall’s function instead of assuming more cement is always better.
Q: How do I know if my sand is good enough for mortar?
Run the bottle test: fill a clear bottle roughly a third full with sand, add water, shake it, and let it settle for a few minutes. If silt and clay form a visible layer more than about 6mm thick on top of the sand, the sand has too many impurities and will weaken the bond. Clean, sharp sand with minimal fines gives the strongest and most workable mortar.
Conclusion
Mortar ratios are not a minor site detail. They decide whether a wall performs for decades or starts showing cracks and damp within the first rainy season. In simple terms, match the ratio to the job, measure it consistently with a gauge box, control the water, and protect the joints while they cure. Get those four things right every time, and you remove one of the most common causes of masonry failure on Kenyan construction sites.
Want more practical construction knowledge delivered directly to you?
Subscribe to our YouTube channel: https://www.youtube.com/@TheCivilEngineeringHub-001
PS: Join our engineering WhatsApp community for daily learning at +254731393520