

A snag list is a written record of every defect, omission or unfinished item found in a building before it is handed over to the client. It is the document that decides whether a project is truly complete or only looks complete from the gate.
The truth is.. most handover disputes do not come from big structural failures. They come from cracked tiles, doors that do not close, sockets with no power and paint that peels after the first rains. Each item is small, but together they delay your final payment and damage your reputation.
In this guide you will learn what goes into a snag list, who prepares it, how to run a snagging inspection room by room, and how to close out items with proof. Whether you are a site supervisor, foreman, project manager, mason, electrician or plumber, this is how you protect your work at the finish line.
Quick Answer: A snag list is a room by room record of defects and incomplete work found before handover, which the contractor must fix and the supervisor must sign off before practical completion is certified.
What Is a Snag List and Why Does It Matter at Handover?
In simple terms, a snag is any item that does not match the drawings, the specification or an acceptable standard of workmanship. A snag list collects all of them in one document so that nothing depends on memory or verbal promises.
On most Kenyan building contracts, including those based on the JBC Agreement and Schedule of Conditions of Building Contract, the architect or project manager certifies practical completion only when the works are substantially finished. Minor outstanding items are listed and given a deadline. That list is your snag list.
It matters because money is tied to it. Retention is commonly held until defects are made good, so a long snag list means a long wait for cash. Always confirm the exact retention percentage and release terms in your own contract.
Snags are normally grouped by type so the right trade gets the right job. The table below shows the usual categories.
| Category | What it means | Typical example | Who fixes it |
|---|---|---|---|
| Incomplete work | Item not finished | Missing skirting in a bedroom | Responsible trade |
| Defective work | Done, but below standard | Hollow tiles that sound loose | Trade that installed it |
| Non conforming work | Differs from drawings or specification | Wrong door swing or wrong paint colour | Contractor, after architect instruction |
| Damage | Harmed after installation | Scratched glass, chipped sanitary ware | Party who caused it |
| Missing items | Not supplied or fitted | No door stops, no switch plates | Supplier or trade |
Who Prepares the Snag List and Who Signs It Off?
Honestly, snagging works best when it is shared. The contractor’s site team does an internal snag first, then the consultants do theirs, and the client may add a final walk through.
Under the Occupational Safety and Health Act 2007, the building must also be safe for the inspection team. Remove loose materials, cover open trenches and isolate live wiring before anyone walks the floors. Under NCA requirements, the registered contractor stays responsible for the quality of what is built, so your internal snag is the first line of defence.
| Role | Responsibility in snagging |
|---|---|
| Site supervisor or foreman | Leads the internal snag, assigns items to trades, tracks completion |
| Project manager | Sets deadlines, coordinates consultants, reports progress to the client |
| Architect | Checks finishes, joinery, fittings and conformity to drawings |
| Structural engineer | Checks visible cracks, honeycombing, deflection and exposed reinforcement |
| MEP engineer | Tests lighting, sockets, water pressure, drainage and fire systems |
| Quantity surveyor | Confirms omitted work for valuation and the final account |
| Client | Final walk through and acceptance |
Notice that everyone on the team has a part to play. A snag list is not an attack on the contractor. It is a quality tool that protects every trade, because it shows exactly what was fixed and who fixed it.
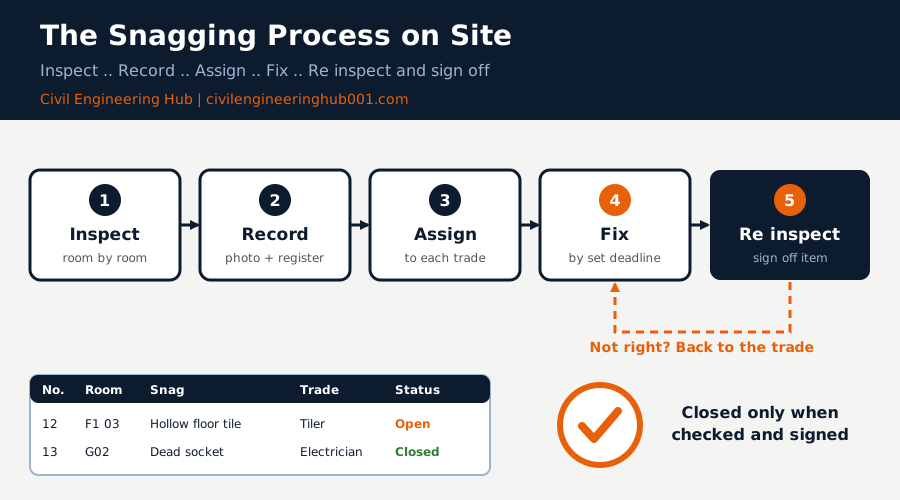
How Do You Run a Snagging Inspection Step by Step?
A good snagging walk is slow, systematic and documented. Do not leave it for the last day before handover. Start two to three weeks earlier so the trades have time to correct what you find.
| Step | Action | Site tip |
|---|---|---|
| 1 | Collect drawings, specification and finishes schedule | Inspect against documents, not opinion |
| 2 | Number every room and external area | Mark room codes such as G01 or F1 03 on the floor plan |
| 3 | Inspect ceilings first, then walls, then floors | Protects finished floors from new damage |
| 4 | Test everything that operates | Doors, windows, taps, switches, flushes, locks |
| 5 | Photograph each snag with its room code | Include a tape or marker for scale |
| 6 | Record in a register | Item number, location, description, trade, deadline |
| 7 | Issue the list to all trades | Written, signed and dated |
| 8 | Re inspect and close out | Sign each item with date and initials |
Keep the tools simple: a torch, a spirit level, a 2 metre straight edge, a tape, a socket tester and a phone for photos. Tap tiles gently with a rod or a coin. A hollow sound means poor bond and likely cracking later.
Check plastered walls with the straight edge. A gap of more than about 3 mm under a 2 metre straight edge is usually a workmanship issue worth recording, but your specification always governs the allowed tolerance.
Respect the sequence of trades too. Paint touch ups come last, otherwise the painter repaints after every other trade has finished.
Write each snag so that a tradesperson who was not on the walk can understand it. Instead of writing bad finish, write hairline crack along the left corner of the bedroom 2 ceiling, about 600 mm long. Specific wording saves a second site visit and removes arguments about what was meant.
Give every snag a priority as well. Safety items such as exposed wiring, missing balustrades or leaking gas connections must be fixed first, then items that stop the building from being used, and finally cosmetic touch ups. This helps the foreman use limited labour where it matters most.
What Are the Most Common Snags on Kenyan Building Sites?
After a few handovers you start to see the same problems repeat. The table lists the common ones and how to prevent them early, because prevention is always cheaper than correction.
| Trade | Common snag | Likely cause | Prevention |
|---|---|---|---|
| Masonry and plaster | Wavy walls, hairline cracks | Poor setting out, no curing | Use lines and plumb bob, cure plaster for at least 3 days |
| Tiling | Hollow or lipped tiles | Poor adhesive coverage, uneven screed | Check screed level first, back butter large tiles |
| Carpentry and joinery | Doors rubbing, gaps at frames | Green timber, poor hanging | Use seasoned timber, check frame plumb |
| Painting | Patchy finish, peeling | Damp walls, no primer | Let walls dry, apply the specified coats |
| Electrical | Dead sockets, loose plates | Incomplete testing | Test every circuit, label the distribution board |
| Plumbing | Slow drains, leaking joints | Low falls, poor joints | Pressure test before covering pipes |
| Concrete | Honeycombing, exposed bars | Poor compaction, wrong cover | Use cover blocks, vibrate properly |
Structural snags need special care. Honeycombing or cracks in beams and columns should not be patched by the mason alone. Refer them to the structural engineer first and follow the engineer’s repair method.
How Do You Close Out Snags and Avoid Repeat Defects?
A snag is only closed when it is fixed, checked and signed. Not when someone says it is done.
Here is a simple close out routine that works on site:
- Give each trade only their own items, with room codes and photos.
- Agree a deadline for each item, usually 7 to 14 days for minor works.
- Re inspect with the same person who raised the snag.
- Photograph the completed fix and attach it to the register.
- Track the percentage closed each week and report it to the project manager.
Then review the pattern. If twenty snags are loose tiles, the problem is the screed or the adhesive process, not the tiler’s mood. Fix the process on the next project and the snag list becomes a training tool.
Finally, remember the Defects Liability Period. Many contracts allow 6 to 12 months after practical completion, so check your appendix. Good snagging reduces what comes back during that period.
Frequently Asked Questions
Q: Is a snag list the same as a defects list?
Not exactly. A snag list is prepared before or at practical completion, while a defects list normally refers to faults reported during the Defects Liability Period. Many people use the terms loosely on site. What matters is that every item is written down, assigned to a trade and closed with a signature.
Q: Who pays for fixing snags?
The contractor normally fixes snags at their own cost because they are defective or incomplete work. The exception is damage caused by others or work changed by a client instruction. In that case the QS and project manager should record it as a variation, so it is valued properly in the final account.
Q: When should snagging start?
Start internal snagging room by room as each area finishes, then do a full building snag two to three weeks before the planned handover. Early snagging catches problems while the trades are still on site. Waiting until the last week usually means rushed repairs and repeat visits.
Conclusion
A snag list is more than a handover formality. It is proof of quality, a tool for managing trades, and the key to releasing retention and closing the project cleanly.
Inspect against the drawings, record every item with photos and room codes, assign each one to the right trade, and close it only when it has been checked and signed. Do that consistently and your handovers will be faster, your clients happier and your reputation stronger.
Want more practical construction knowledge delivered directly to you?
Subscribe to our YouTube channel: https://www.youtube.com/@TheCivilEngineeringHub-001
PS: Join our engineering WhatsApp community for daily learning at +254731393520