

Every finish in a completed building, from the tile in the kitchen to the paint on the ceiling, was decided long before anyone mixed mortar. That decision lives in one document: the schedule of finishes.
A schedule of finishes is a table in the architectural drawing set that lists, room by room, the floor, wall, ceiling and skirting finish, with the material, size, colour and specification reference for each. In simple terms, it is the instruction sheet for everything that covers the structure.
The truth is that most finishing disputes start with someone not reading this single page. The mason plasters to the wrong thickness, the tiler orders the wrong size, the painter uses the wrong system, and the client rejects the work.
Whether you are an architect, a quantity surveyor, a mason, a plumber or a site supervisor, this guide shows you how to read the schedule, who uses it, and how to avoid costly mistakes on Kenyan sites.
Quick Answer: A schedule of finishes is a room-by-room table in the architectural drawings that states the floor, wall, ceiling and skirting finish for every space. You use it to order materials, price finishing work, instruct artisans and check completed work against the design.
What does a schedule of finishes actually contain?
Most schedules are laid out as a grid. Rooms run down the left side and building elements run across the top. Each cell names the finish for that element in that room.
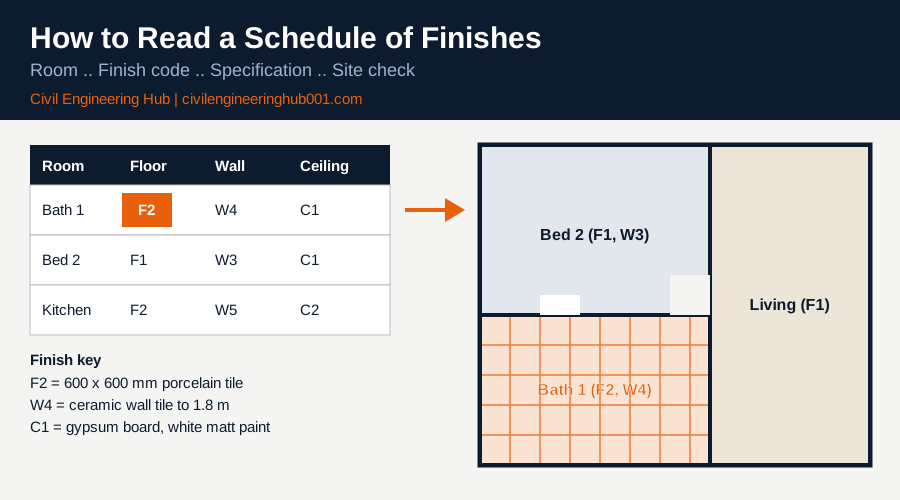
Good schedules also use finish codes, such as F1 for porcelain floor tile or W3 for emulsion paint on plaster. The same codes are repeated on the floor plans, sections and room data sheets, so every trade refers to the same item. The table below shows what each column is telling you.
| Schedule column | What it tells you |
|---|---|
| Room name and number | The space the finishes apply to, for example Bedroom 2 or Room 105. |
| Floor finish | Material, size and bedding, for example 600 x 600 mm porcelain tile on 25 mm screed. |
| Wall finish | Plaster, tile or paint system, for example 12 mm plaster with two coats of emulsion. |
| Ceiling finish | Board, plaster or paint, for example 12.5 mm gypsum board with white matt paint. |
| Skirting and trim | Height and material, for example 100 mm ceramic skirting. |
| Remarks | Special notes, colour references and waterproofing, for example tanking to 1.8 m in showers. |
How do you read a schedule of finishes step by step?
Reading the schedule properly takes about five minutes and can save days of rework. Do it before any finishing material is ordered or any artisan starts work.
Follow the sequence in the table below every time you receive a new drawing set or a revision. It works the same way for a ten-room house and a twenty-storey block.
| Step | What to do and why |
|---|---|
| 1. Check the revision | Confirm drawing number, revision and date. Old revisions are the top source of wrong finishes. |
| 2. Match the room | Find the room on the schedule and on the floor plan. Room numbers must agree on both. |
| 3. Read the codes | Note the finish code for each element. The code links to the specification and materials list. |
| 4. Check the legend | Read sizes, colours and brands in the key. Legends hold details the grid has no room for. |
| 5. Cross-check other documents | Compare with the specification, door and window schedules and structural levels. |
| 6. Raise conflicts early | Write an RFI for any mismatch. Clarify in writing before work starts. |
Honestly, step 5 is where most people stop short. If the schedule calls for a 25 mm screed and a 10 mm tile, the structural slab level must be set 35 mm below the finished floor level. Get it wrong and you end up with a step at the door or a bathroom floor that does not fall to the drain.
Workmanship should follow BS 5385 for wall and floor tiling, BS 8204 for screeds, and BS 8000 for workmanship on building sites. These are the standards most Kenyan specifications refer to, alongside KEBS-certified materials and the Kenya Building Code.
Who uses the schedule of finishes on a construction project?
The schedule is not only an architect’s document. Every professional on the project touches it at a different stage, and each one reads it for a different reason.
| Role | How they use the schedule |
|---|---|
| Architect | Sets the design intent and updates the schedule when a selection changes. |
| Quantity surveyor | Measures and prices each finish in the BOQ and values finishing work for payment. |
| Site engineer or supervisor | Checks levels, sets out falls and inspects completed work against the codes. |
| Mason, tiler and painter | Confirm material, thickness, pattern and number of coats before starting. |
| Plumber and electrician | Confirm tile heights and ceiling types so fittings, sockets and lights sit correctly. |
| Storekeeper | Orders and receives only the approved materials, colours and batches. |
What mistakes do site teams make with finishes, and how do you avoid them?
Finishes are visible, so errors are expensive. A wrong structural bar can be hidden under plaster; a wrong tile cannot. Here are the mistakes that appear most often on Kenyan sites, and the fix for each.
- Working from an old revision. Mark superseded drawings and remove them from site.
- Ordering before approval. Get a sample board signed off by the architect and the client first.
- Mixing batches. Order tiles and paint in one batch, because shade varies between production runs.
- Ignoring services. Agree socket and fitting positions before tiling, not after.
The table below gives typical site practice for common finishes. Always confirm against your own specification, because the project documents override general practice.
| Finish | Typical site practice | Check against |
|---|---|---|
| Floor screed | 25 to 50 mm | BS 8204, level drawings |
| Internal plaster | 12 to 15 mm, two coats | Specification, sample panel |
| External render | About 20 mm, two coats | Specification, exposure |
| Ceramic floor tile | Adhesive bed, 2 to 3 mm joints | BS 5385, supplier data |
| Emulsion paint | One primer, two finish coats | Paint schedule, supplier data |
How can you write a schedule of finishes that site teams can actually follow?
If you are the architect or technologist preparing the schedule, think about the person holding it on site with dust on their hands. Clarity beats elegance every time.
Use one code per finish and never reuse a code for two different materials. Give sizes in millimetres, state the number of coats, and name the colour with a reference the supplier can match. Where a room has a special condition, such as a wet area, a kitchen or a ramp, say so in the remarks column.
It also helps to attach a finishes key plan that colours each room by floor finish. A contractor can then see in seconds where the tiles stop and the screed begins, and the storekeeper can total quantities without guessing.
Finally, issue the schedule with a revision table, and make sure the QS, the site engineer and the artisans all receive the same revision on the same day. In simple terms, one schedule, one revision, one source of truth.
How does the schedule of finishes affect cost and the BOQ?
Finishes often account for a large share of building cost, and they are also where clients change their minds. Each change to the schedule is a variation that the quantity surveyor must measure, price and record.
That is why the schedule should be treated as a controlled document. Any substitution, such as moving from porcelain to ceramic tile, needs written approval from the architect, a cost check and an updated revision. Under NCA requirements the contractor stays responsible for workmanship, so keep every approval on file.
For students and young engineers, this is a habit worth building early. On your first site attachment, ask for the finishes schedule on day one and walk each room with it in hand. Compare what is on paper with what is on the wall, floor and ceiling. That simple routine trains your eye, and it is exactly the kind of attention to detail that supervisors and clients remember.
Frequently Asked Questions
Q: Is a schedule of finishes the same as a finishes specification?
No. The schedule is a summary table showing what goes where. The specification explains the quality, brand, method and testing requirements for each material. You need both documents together to build and price the work correctly.
Q: Who prepares the schedule of finishes?
The architect prepares it, often with input from the interior designer and the client. The quantity surveyor then uses it to prepare the BOQ. On small projects the same person may handle both tasks, but the information should still be checked by a second pair of eyes.
Q: What should I do if the schedule and the drawings disagree?
Stop the affected work and write an RFI to the architect. Do not choose the cheaper or easier option yourself. Keep the written reply on file, because it protects you if the finish is questioned later.
Conclusion
The schedule of finishes is a short document that controls a large part of your budget, programme and quality. Read it before ordering, cross-check it against levels and services, and put every change in writing.
When every trade works from the same current schedule, finishing goes faster and handover goes smoother. That is the standard a serious construction professional should hold on every project, whether you draw it, price it, build it or inspect it.
Want more practical construction knowledge delivered directly to you?
Subscribe to our YouTube channel: https://www.youtube.com/@TheCivilEngineeringHub-001
PS: Join our engineering WhatsApp community for daily learning at +254731393520