

Floor tiles look simple to lay until the grout lines start wandering and lippage shows up under raking light. How you lay floor tiles determines whether the finish lasts twenty years or starts popping loose in two rainy seasons. In simple terms, correct tile laying comes down to four things done in order: a flat and properly cured substrate, the right adhesive bed, accurate setting out, and controlled curing before the floor takes traffic.
Skip any one of those steps and no amount of expensive tile will save the finish. On most Kenyan sites, the real failure point is not the tile quality, it is rushed screed and undersized adhesive coverage. This applies whether you are tiling a small bathroom or a full commercial floor, the fundamentals do not change with scale, only the tolerance for error shrinks as the area grows. This guide walks through the process the way a site foreman would explain it to a new mason, from tools to grouting, so you can supervise or execute the work with confidence.
Quick Answer: Lay floor tiles by preparing a flat, clean, and fully cured screed, applying tile adhesive with a notched trowel for full coverage, setting tiles to a chalk-lined grid with spacers for consistent joints, checking level continuously with a spirit level, and allowing 24 to 48 hours before grouting and opening the floor to traffic.
Why Floor Tile Laying Fails Even When the Design is Right
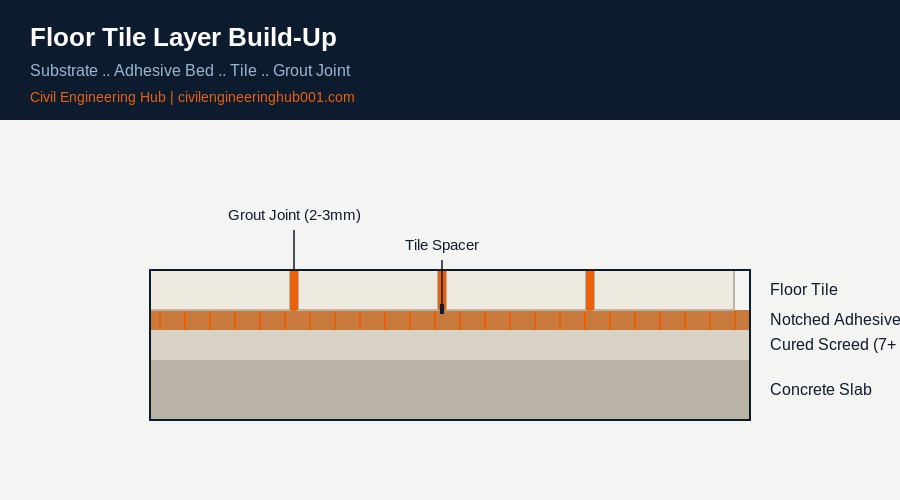
Most tile failures trace back to the substrate, not the tile itself. Cement screed needs a minimum of seven days to cure before tiling begins, and longer in humid coastal sites. Tiling onto a green screed traps moisture underneath, and that moisture eventually pushes tiles up or causes hollow, drumming sounds when you tap them.
BS 5385, the code of practice for wall and floor tiling, sets out moisture, flatness, and adhesive coverage requirements that apply directly to this stage. The truth is, a floor that looks perfectly laid on day one can fail within months if the substrate was not given time to stabilize first. Always check screed age and dryness before ordering adhesive.
Flatness matters just as much as dryness. BS 5385 recommends a tolerance of no more than 3mm deviation under a 2 metre straightedge for most floor finishes. Anything beyond that forces the tiler to compensate with extra adhesive thickness in low spots, which slows curing and increases the risk of hollow patches. If you inherit a screed that fails this check, flag it to the site engineer before tiling starts, not after the first row is down.
What Tools and Materials You Need Before You Start
Assemble everything before mixing any adhesive. Stopping midway to source a missing tool is how joints end up uneven.
| Tool or Material | Purpose on Site |
|---|---|
| Notched trowel (6mm or 10mm) | Spreads adhesive evenly for full bed coverage |
| Tile spacers | Keep grout joints consistent, typically 2 to 3mm for floor tiles |
| Spirit level or laser level | Checks that the floor plane stays true across the room |
| Rubber mallet | Beds tiles into the adhesive without cracking the glaze |
| Tile cutter or wet saw | Cuts tiles cleanly at edges and around fittings |
| Cement-based or flexible adhesive | Bonds tile to substrate, selected per BS EN 12004 class |
| Grout | Fills joints and seals the floor against water ingress |
| Chalk line | Marks the reference grid before laying begins |
Planning Your Tile Layout Before You Start
Layout planning happens before adhesive touches the floor, not while you are kneeling in the middle of the room. Measure the room and find its true center point along both axes, then dry-lay a row of tiles from that center point toward each wall.
The goal is to avoid ending up with a thin sliver of cut tile against a visible wall or doorway. If your dry-lay shows a cut smaller than half a tile width at a prominent edge, shift the starting grid by half a tile so the cuts balance on both sides instead. This single check, done early, is the difference between a floor that looks intentional and one that looks like an afterthought.
Also decide your tile orientation and pattern before you start, whether it is a straight grid, a running bond, or diagonal layout, because each pattern changes how much waste you cut and how the room reads visually once finished.
The Correct Floor Tile Laying Process, Step by Step
Once the screed has cured and your tools are ready, follow this sequence. Do not skip the dry-lay step, it is what saves you from an awkward sliver of cut tile against the main entrance.
| Step | What to Do |
|---|---|
| 1 | Confirm the screed has cured a minimum of 7 days and is dry, flat, and free of dust |
| 2 | Snap chalk lines to mark the center point and working grid of the room |
| 3 | Dry-lay a row of tiles along the grid to check edge cuts before mixing any adhesive |
| 4 | Mix adhesive to the manufacturer ratio, avoid adding excess water |
| 5 | Spread adhesive with the flat side of the trowel, then comb with the notched side at 45 degrees |
| 6 | Press each tile in with a slight twisting motion, tap with a rubber mallet to bed it level |
| 7 | Insert spacers immediately and check level every 3 to 4 tiles with a spirit level |
| 8 | Leave to cure 24 to 48 hours before grouting, and only grout once adhesive has fully set |
For large format tiles, above 600mm, back-buttering is not optional. That means applying a thin layer of adhesive to the back of the tile itself in addition to the floor, so you get full contact and avoid hollow spots that crack under point load later.
Understanding Tile Adhesive and Grout Selection
Not every adhesive suits every tile. Standard cement-based adhesive works for porous tiles like ceramic on a stable concrete substrate. Porcelain tiles, which absorb almost no water, need a flexible or polymer-modified adhesive that grips a low-porosity surface properly. This is where BS EN 12004 classification helps, it tells you whether an adhesive is standard, improved, or fast-setting, and whether it has slip resistance for wall use.
For wet areas like bathrooms, kitchens, and balconies, always pair correct adhesive selection with a waterproof membrane underneath. Honestly, this is the step most artisans skip because it adds cost, but it is far cheaper than breaking out a failed floor two years later. Grout choice matters too. Cementitious grout is standard for most joints, while epoxy grout resists staining and moisture better in high-traffic or wet zones, though it costs more and sets faster, so mix only what you can apply in one session.
Climate also affects your working time. In Nairobi’s cooler highland conditions, adhesive open time runs close to what the manufacturer states on the bag. In hotter coastal areas like Mombasa, adhesive skins over faster, so mix smaller batches and work in tighter sections to avoid troweling adhesive that has already started to set before the tile goes down.
Common Floor Tiling Mistakes on Kenyan Sites
These recur across residential and commercial sites regardless of tile brand or price point.
Laying on a green screed. Rushing the programme to hit handover dates means tiling before the screed has cured, which traps moisture and causes drumming or lifting.
Skipping back-buttering on large tiles. This leaves air pockets that sound hollow and eventually crack under furniture legs or foot traffic.
Inconsistent adhesive bed thickness. Uneven trowel technique creates high and low spots, which shows up as lippage where tile edges do not sit flush with each other.
Ignoring expansion joints. Large floor areas need movement joints, especially where tile meets a different material or crosses a structural joint. Skipping this causes tiles to crack or pop up as the slab expands and contracts with temperature.
Grouting too early. Grouting before the adhesive has set traps moisture in the joint and weakens the bond, so always respect the 24 to 48 hour window.
Frequently Asked Questions
Q: How long should you wait before walking on newly laid floor tiles?
Wait at least 24 hours for light foot traffic and up to 48 hours before moving furniture or heavier loads. Full curing of the adhesive can take up to 2 weeks, so avoid soaking the floor with water or placing heavy equipment on it during that window.
Q: What is the ideal grout joint width for floor tiles?
Most floor tiles use a 2 to 3mm joint, though rectified tiles with precise edges can go as narrow as 1.5mm. Wider joints, around 5mm, are common for rustic or outdoor tiles where slight size variation needs more room to sit level.
Q: Can you lay tiles directly on top of old tiles?
Yes, but only if the existing tiles are firmly bonded, flat, and free of cracks. You must key the surface, use a flexible bonding adhesive rated for tile-on-tile application, and account for the added floor height at doorways and thresholds.
Floor tile laying rewards patience more than speed. Get the screed timing right, use the correct adhesive for your tile type, keep your grid accurate, and respect the curing windows, and the floor will outlast the building’s next three coats of paint. In simple terms, every step in this guide exists because someone learned the hard way what happens when it gets skipped. Apply the process in order and your tiling will hold up under real site conditions, not just on installation day.
Want more practical construction knowledge delivered directly to you?
Subscribe to our YouTube channel: https://www.youtube.com/@TheCivilEngineeringHub-001
PS: Join our engineering WhatsApp community for daily learning at +254731393520