

Plaster cracks are one of the most common complaints on any finished building, and most of them do not start with the plaster. The truth is, cracks usually come from movement, fast moisture loss, or poor workmanship that began long before the plasterer picked up a trowel.
In simple terms, plaster cracks when the stress in the wall becomes greater than the tensile strength of the plaster. That stress comes from shrinkage, temperature change, structural movement, or a weak bond with the background.
On Kenyan sites, the dry heat in Nairobi, the wind on the coast, and tight programmes make the problem worse. Dirty sand, thick single coats, and skipped curing show up as cracks within weeks. This guide explains the main causes, how to read a crack pattern, and what masons, engineers, architects, and site supervisors can do to stop cracks before they start.
Quick Answer: Plaster cracks mainly because of shrinkage from poor curing, wrong mix ratios, weak bond to the wall, and structural movement. You prevent them by using clean, well-graded sand, a 1:4 to 1:6 mix, wetting the wall first, applying thin coats, and curing for at least three days.
Why does plaster crack in the first place?
Cement plaster is a mix of cement, sand, and water. As the excess water leaves the mix, the plaster shrinks. If the wall underneath holds it in place, tension builds up, and the plaster relieves that tension by cracking.
Two things decide whether it cracks: how much it shrinks, and how well it bonds or moves with the wall. That is why the same mason can plaster two walls on the same day and get a clean finish on one and a network of cracks on the other.
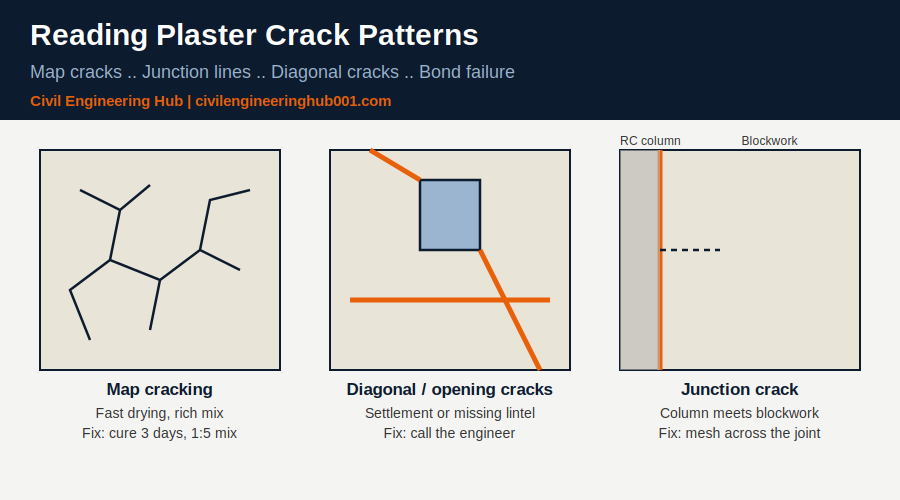
The table below links the common causes to what you actually see on the wall.
| Cause | Typical crack pattern | When it appears |
|---|---|---|
| Plastic shrinkage (fast drying) | Fine random map cracking | Within 1 to 3 days |
| Rich mix (too much cement) | Dense hairline crazing | Within 1 to 2 weeks |
| Different materials meeting | Straight horizontal or vertical line | Weeks to months |
| Structural settlement | Diagonal cracks from openings | Months after handover |
| Poor bond to background | Hollow sound, then cracks and peeling | Weeks to months |
How do mix ratios and sand quality affect plaster cracking?
Most shrinkage cracks trace back to the mix. Too much cement gives a strong but brittle coat that shrinks hard. Too much fine sand or clay increases water demand, and more water means more shrinkage.
Cement should comply with KS EN 197-1, and the mortar and application should follow BS EN 998-1 and BS EN 13914-2 for internal plastering. On site, the practical rule is simple: the plaster must be weaker than the background it sits on, never stronger.
Sand is where many Kenyan sites lose the battle. River sand that is washed and well graded is ideal. Pit sand with silt or clay, or sea sand with salts, causes cracking, efflorescence, and poor bond. A quick jar test on site will show you how much silt is in your sand.
| Application | Cement : Sand | Coat thickness |
|---|---|---|
| Internal walls (blockwork) | 1:5 or 1:6 | 12 to 15 mm |
| External walls, first coat | 1:4 | 10 to 12 mm |
| External walls, finishing coat | 1:5 | 6 to 8 mm |
| Ceilings and soffits | 1:4 | 6 to 10 mm |
Honestly, a 1:3 mix is one of the biggest mistakes we see. Masons think richer means better. It does not. It cracks more and it debonds from the block.
Water is the other half of the mix. Every extra litre of water in a plaster batch is a litre that must leave later, and it leaves as shrinkage. Mix to a workable, non-runny consistency, and never re-temper a batch that has already started to stiffen. On most sites, plaster that is older than about two hours should be thrown away, not remixed.
What does the wall behind the plaster have to do with cracks?
Plaster is only as good as the surface it is stuck to. A dusty, oily, or very smooth background gives poor bond. A very dry block will suck water out of the plaster before it can set, which causes cracking and a hollow sound when you tap it.
Blocks and concrete also move differently. Where a concrete column meets a block wall, the two materials expand, shrink, and settle at different rates. Without reinforcement across that junction, a crack line will appear exactly along the joint.
Blockwork should also be given time to shrink before plastering. Fresh blocks and fresh mortar joints continue to shrink for weeks, and plastering too early traps that movement under the coat.
Site supervisors should treat the preparation stage as a hold point. Here is the sequence that works:
| Step | Action | Why it matters |
|---|---|---|
| 1 | Rake out joints and brush the wall clean | Removes dust and loose mortar for a key |
| 2 | Fix expanded metal or mesh across concrete and block junctions | Controls movement cracks |
| 3 | Wet the wall the day before and again before plastering | Stops the block from robbing the mix of water |
| 4 | Apply a splatter dash or bonding coat on smooth concrete | Improves mechanical bond |
| 5 | Plaster in coats, not one thick layer | Reduces shrinkage stress |
| 6 | Cure with a fine water spray or damp sacking | Keeps hydration going |
How can you tell a cosmetic crack from a structural one?
Not every crack is a plastering problem. Diagonal cracks running from the corners of doors and windows, cracks that widen over time, or cracks that continue through the wall and into the structure need an engineer, not a plasterer.
For reinforced concrete, BS 8110 limits design crack widths to about 0.3 mm for normal exposure. For walls, BRE Digest 251 gives a useful rule of thumb for classifying damage by crack width.
| Crack width | Category | Action |
|---|---|---|
| Below 0.1 mm | Negligible | Fill during repainting |
| Up to 1 mm | Slight | Fill and redecorate, monitor |
| 1 to 5 mm | Moderate | Investigate cause, cut out and patch |
| Above 5 mm | Severe | Call the structural engineer |
Use a simple crack monitor or a pencil mark with a date. If the crack grows, the cause is movement in the structure or foundation, and repairing the plaster alone will only hide the problem for a few months.
How do you repair and prevent plaster cracks on site?
For hairline shrinkage cracks, rake the crack slightly, dampen it, and fill with a polymer-modified filler or a 1:3 cement sand slurry, then repaint with a flexible paint. For wider cracks, cut a V-groove, apply a bonding agent, and patch in layers.
Prevention is cheaper than repair, and it comes down to discipline on a few points:
- Curing: keep the plaster damp for at least three days, longer in hot and windy weather.
- Weather: avoid plastering in direct afternoon sun on external walls. Shade the wall or work with the sun.
- Thickness: never exceed 15 mm in one coat. Build up in layers and score the first coat for a key.
- Movement joints: provide them at long walls and at changes of material, as the architect details.
- Supervision: check mix ratios with gauge boxes, not shovels counted by feel.
Finishing technique matters as well. Over-trowelling brings fine cement paste to the surface, and that paste shrinks faster than the mix underneath, which gives crazing. Float the surface once it has stiffened, and stop as soon as it is flat and even. External walls also need a good roof overhang, proper sills, and a damp-proof course so that rain and rising damp do not keep soaking and drying the plaster.
Cracked plaster also affects your reputation and your retention money. Under most contracts, workmanship defects that appear within the defects liability period must be made good at the contractor’s cost.
Frequently Asked Questions
Q: How long should I cure plaster before painting?
Cure the plaster with water for at least three days, then let it dry for about two to four weeks before painting. Painting too early traps moisture and causes blistering and efflorescence. In humid areas such as Mombasa, the drying period may be longer.
Q: Can I add lime or a plasticiser to reduce cracking?
Yes. A small amount of hydrated lime or an approved plasticiser improves workability and reduces the water needed, which reduces shrinkage. Follow the manufacturer’s dosage, because overdosing weakens the plaster and affects bond.
Q: Why do cracks appear along the joint between blocks and columns?
The concrete column and the block wall shrink and move differently. Without mesh across the junction, the stress concentrates on that line and the plaster splits. Fixing expanded metal or fibre mesh 150 mm each side of the joint before plastering prevents it.
Final takeaway for the whole construction team
Plaster cracks are rarely bad luck. They come from the mix, the wall, the weather, or the structure, and each cause leaves a pattern you can read. Masons control the mix and curing, supervisors control preparation, architects detail the joints, and engineers confirm when a crack is structural.
Get those four roles working together and your finishes will last well beyond the defects liability period.
Want more practical construction knowledge delivered directly to you?
Subscribe to our YouTube channel: https://www.youtube.com/@TheCivilEngineeringHub-001
PS: Join our engineering WhatsApp community for daily learning at +254731393520