

Walk onto any building site at ceiling stage and you will see the same scene. The electrician has cut openings for downlights, the plumber has a sprinkler head in the wrong place, and the ceiling fixer is staring at a drawing nobody read properly.
The truth is, most of that rework comes from one drawing that gets less attention than it deserves: the reflected ceiling plan, or RCP.
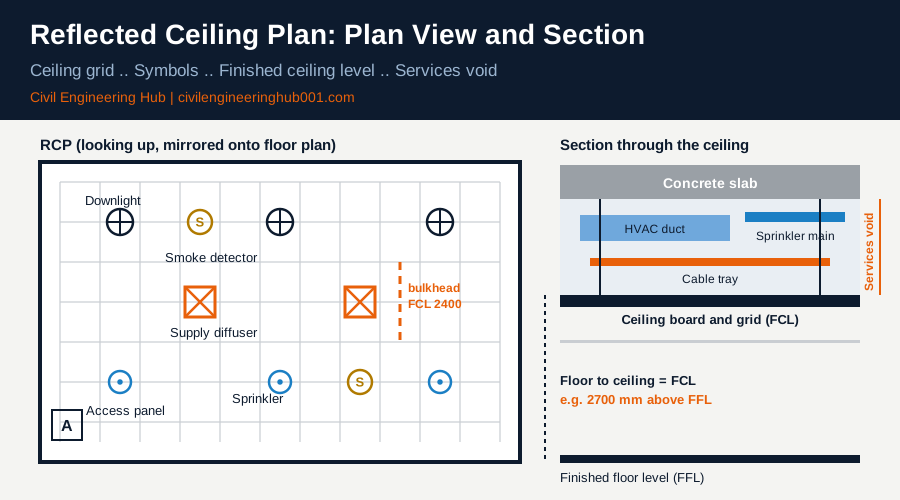
A reflected ceiling plan is a drawing of the ceiling as if you were looking up at it from the floor, mirrored onto the floor plan so that every element sits directly above the room it serves. It shows lights, diffusers, sprinklers, smoke detectors, access panels, bulkheads and ceiling levels in one place.
In simple terms.. the floor plan tells you what is on the ground, and the RCP tells you what is above your head. Architects, electricians, plumbers, HVAC installers, ceiling fixers, quantity surveyors and site supervisors all work from it. This guide shows you how to read one, what the symbols mean, and how to catch clashes before the ceiling is closed.
Quick Answer: A reflected ceiling plan is a mirrored view looking up at the ceiling, drawn over the room layout. To read it, start with the legend and ceiling levels, then match each symbol to its trade, then check spacing and clashes against the floor plan and the service drawings.
What is a reflected ceiling plan and why is it drawn upside down?
A normal floor plan is a horizontal cut through the building about 1.2 m above the floor, looking down. A reflected ceiling plan imagines a mirror lying on the floor, reflecting the ceiling upwards onto it.
The reason is practical. If the ceiling were drawn as a plain view from below, it would appear flipped left to right compared with the floor plan, and you would have to reverse it in your head every time. Drawing it as a reflection keeps the walls, doors and columns in exactly the same position on both sheets.
That means you can lay the RCP over the floor plan and everything lines up. A downlight above the centre of a desk on the floor plan sits at the centre of that desk on the RCP too.
Which symbols must you recognise first on a reflected ceiling plan?
Always read the legend before the drawing. Symbols are not fully standardised in Kenya, so each architect’s office has its own set. Most still follow the pattern below.
| Element | Trade responsible | What to check on site |
|---|---|---|
| Recessed downlight (circle with cross) | Electrical | Cut-out size and void depth |
| Light panel 600 x 600 (square with diagonal) | Electrical | Fits the ceiling grid module |
| Supply air diffuser (square with X) | HVAC | Duct connection above |
| Sprinkler head (circle with dot) | Fire services | Clear distance from lights and walls |
| Smoke detector (circle with S) | Fire alarm | Spacing to BS 5839-1 |
| Access panel (square with A) | Ceiling fixer | Sits below valves and junction boxes |
| Bulkhead or drop (dashed line with level) | Carpenter, ceiling fixer | Finished level in mm |
The tricky ones are the dashed lines. A dashed outline usually means something is above the ceiling or at a different level, such as a bulkhead, a beam or a recess.
Honestly.. if a symbol is not in the legend, stop and ask. A guess at ceiling stage costs far more than a short RFI.
How do you read ceiling heights and levels on the drawing?
Ceiling height is shown as a level in a small tag, usually the finished ceiling level (FCL) measured from the finished floor level (FFL). For example, FCL 2700 means the finished ceiling is 2,700 mm above the finished floor.
Different rooms often have different heights. A corridor may drop to 2,400 mm to hide ducts, while the lobby rises to 3,000 mm or more. Where two heights meet, the RCP shows a bulkhead or a step, usually a dashed line with both levels written beside it.
Here is how this connects to the structure. The ceiling void is the space between the underside of the slab and the back of the ceiling board. That void has to hold ducts, pipes, cable trays and the suspension hangers.
If a structural beam is 450 mm deep and the finished ceiling is 2,700 mm above the floor, the architect and structural engineer must confirm that the beam, the floor to floor height and the services all fit. That is why you should always compare the RCP with the structural section and the MEP coordination drawing.
On site, do not trust the level on paper alone. Mark the ceiling level on every wall with a laser level or a water level, and check it against the RCP before any grid or board goes up. Fixing a ceiling that is 50 mm out after the boards are on is slow and expensive.
Check these three things on every sheet:
- Scale and grid: Most RCPs use 1:50 or 1:100, with the ceiling grid shown as a light grid, commonly 600 x 600 mm for lay-in tiles.
- Setting out point: The grid should start from a stated reference, such as the room centre or a main wall, so border tiles are equal on both sides.
- Structural gridlines: These let you locate the columns and beams hidden above the ceiling.
How do the trades share one ceiling without clashing?
A ceiling is the most crowded place in a building. Ducts, sprinkler pipes, cable trays, lighting and fire alarm wiring all compete for the same void, and each trade tends to draw its own layout.
The RCP is where they are brought together. The usual rule of thumb is that the service that needs a fixed fall or the largest size gets priority.
| Service | Priority in the void | Typical clash |
|---|---|---|
| Drainage and soil pipes | Highest, needs a fixed fall | Ducts and beams |
| HVAC ducts | High, large and hard to reroute | Beams and sprinkler mains |
| Sprinkler mains | Medium | Light fittings and ducts |
| Cable trays | Medium, flexible routing | Pipes and hangers |
| Lights and detectors | Lowest, can shift within limits | Diffusers and sprinklers |
Spacing matters too. As a working guide, keep smoke detectors away from supply diffusers, commonly at least 1 m, because the airflow can push smoke away from the sensor. Sprinkler heads need clear space around them, so a light fitting or bulkhead placed too close can block the spray pattern. Always confirm exact distances in the manufacturer data and the fire engineer’s design.
The best fix is a coordination meeting before the ceiling grid goes up. Lay the RCP, the HVAC layout, the sprinkler layout and the lighting layout over each other on one table and mark every clash in red. It takes an hour and saves a week.
Which standards and Kenyan rules apply to ceilings?
No single code covers a ceiling, so you work from several. These are the main references a Kenyan site team should know.
| Reference | What it covers | Who uses it |
|---|---|---|
| BS EN 13964 | Suspended ceilings, requirements and test methods | Architect, ceiling fixer |
| BS 5839-1 | Fire detection and alarm layout and spacing | Fire alarm installer |
| BS EN 12464-1 | Recommended lighting levels in workplaces | Architect, electrician |
| BS 7671 | Electrical installation wiring rules | Electrician |
| Kenya Building Code and county by-laws | Room heights, ventilation and fire safety | Architect, county approvals |
| Fire Risk Reduction Rules 2007 (OSHA Kenya) | Fire alarms and means of escape in workplaces | Site manager, fire consultant |
Minimum ceiling height for habitable rooms is typically around 2.4 m under local by-laws, but confirm with your county planning office and the approved drawings.
NCA registration pushes contractors to build to approved drawings and specifications. That means any change to the ceiling layout, such as moving a light or lowering a bulkhead, should be recorded in writing and approved by the architect.
What is the step by step method for checking a reflected ceiling plan on site?
Do this check before the ceiling grid goes up, while the void is still open and every trade can fix their work easily.
- Read the legend and notes first, including ceiling types, finishes and paint notes.
- Overlay the RCP on the architectural floor plan and confirm walls, columns and doors match.
- Confirm finished ceiling levels against the structural sections and beam depths.
- Overlay the electrical, HVAC and fire layouts and mark every clash.
- Check the grid setout so border tiles are balanced and equal.
- Match access panels to valves, dampers and junction boxes above.
- Get sign off from each trade before boards are fixed, and take dated photos of the void.
The mistakes we see most often are simple. Lights are centred on the room but not on the grid, so they cut across tile joints. Access panels are forgotten, so someone later cuts a hole in a finished ceiling. And bulkhead heights are ignored until the ductwork arrives.
A ten minute walk through with the foreman and each trade lead, drawing in hand, prevents all three.
Frequently Asked Questions
Q: What is the difference between a floor plan and a reflected ceiling plan?
A floor plan looks down at the building and shows walls, doors, furniture and room layouts. A reflected ceiling plan looks up and shows what is fixed to or hidden above the ceiling, such as lights, diffusers and sprinklers. Both use the same wall positions, so the two sheets overlay perfectly.
Q: Who prepares the reflected ceiling plan?
The architect usually prepares it. The electrical, mechanical and fire consultants supply their own layouts, which the architect places on the RCP. On site, the contractor often produces coordinated shop drawings that merge all trades before work starts.
Q: What scale is a reflected ceiling plan drawn at?
Most are drawn at 1:50 or 1:100 depending on the size of the building. Details such as bulkheads, ceiling junctions and access panels are drawn at 1:20 or 1:10. Always check the scale bar on the sheet before you measure anything off the drawing.
Conclusion: read the ceiling before you close it
A reflected ceiling plan is the one drawing that makes every trade work together. Read the legend, confirm the levels, match each symbol to its trade, and check for clashes while the void is still open.
The ten minutes you spend on the RCP before the grid goes up will save days of cutting, patching and repainting later. Architects, MEP teams, supervisors and quantity surveyors all benefit when the ceiling is coordinated early.
Print the RCP, lay it over the floor plan, and walk the site with it. That habit separates a tidy handover from a long snag list.
Want more practical construction knowledge delivered directly to you?
Subscribe to our YouTube channel: https://www.youtube.com/@TheCivilEngineeringHub-001
PS: Join our engineering WhatsApp community for daily learning at +254731393520