

Waterproofing wet areas on site is one of those jobs that looks simple until it fails two years later and the client is calling you about a stained ceiling below the bathroom. The truth is, waterproofing is not paint. It is a system, and if one layer of that system is wrong, water finds its way through.
In simple terms, waterproofing wet areas means creating a continuous, bonded barrier in bathrooms, kitchens, balconies, roofs and water tanks so water cannot pass through the slab or wall into the structure below. Get it right at construction stage and you save the client years of repair bills. Get it wrong, and no amount of tiling on top will fix it.
This post breaks down the materials, the correct application steps, the mistakes that cause most leaks, and what the codes require.
Quick Answer: Waterproofing wet areas on site means applying a continuous, bonded membrane (cementitious, liquid-applied or sheet membrane) to the slab and up the walls in bathrooms, kitchens, balconies and roofs before tiling, so water cannot penetrate the structure. It must be done before screeding and tiling, never after.
What Counts as a Wet Area on a Construction Site
A wet area is any part of a building that regularly comes into contact with water. That includes bathrooms, kitchens, balconies, roof slabs, water tank bases, swimming pools and laundry rooms. Each of these needs a dedicated waterproofing layer before finishes go on.
Honestly, most callbacks on site do not come from the bathroom. They come from kitchens and balconies, because many contractors treat those as “dry enough” and skip the membrane entirely. Water does not care what room it is in. If there is a floor drain, a sink, a water tank, or exposure to rain, that area needs waterproofing.
Why Waterproofing Fails Most Often on Site
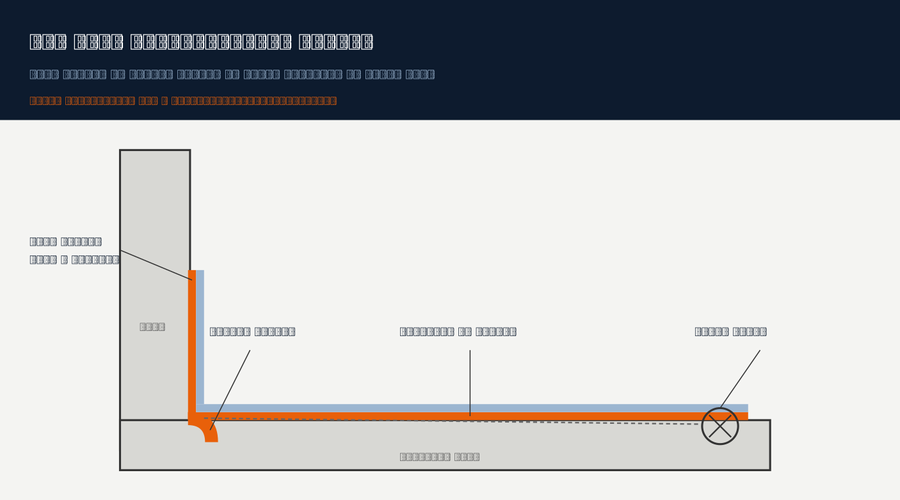
In most cases, the material is not the problem. Workmanship is. Waterproofing fails because of poor surface preparation, rushed curing between coats, missing fillet detailing at wall-to-floor corners, and untreated pipe penetrations.
The wall-to-floor junction is the weakest point in any wet area. That is why the membrane must be dressed up the wall by at least 150mm on normal walls, and up to 1800mm inside a shower recess. Skipping this step is the single biggest cause of ceiling stains in the room below. On site, this comes down to sequencing. The mason applying the coat needs the surface handed over clean and dry, the supervisor needs to check the fillet before the first coat goes on, and nobody should be walking on a fresh coat to save time. A five-minute inspection at each stage catches problems while they still cost nothing to fix.
Types of Waterproofing Materials and Where to Use Them
There are four waterproofing systems commonly used on Kenyan sites, and each suits a different situation. Choosing the wrong one is as costly as applying it badly.
| Type | Best Use | Pros | Cons |
|---|---|---|---|
| Cementitious coating | Bathroom floors, water tanks, wet walls | Easy to apply, bonds directly to concrete, affordable | Rigid, can crack if the slab moves |
| Liquid-applied membrane (bitumen or polyurethane) | Roofs, balconies, planter boxes | Seamless, flexible, handles movement well | Needs correct curing time between coats, UV exposure affects some types |
| Sheet membrane (bituminous or HDPE) | Basements, below-ground water tanks, large roof areas | Consistent thickness, fast to lay on large areas | Needs skilled lapping and sealing at joints |
| Crystalline admixture | Water-retaining structures, basement walls | Self-heals hairline cracks, works within the concrete itself | Must be added at mixing stage, not a surface fix |
For a typical residential bathroom in Kenya, a cementitious coating on the floor and up the walls is the standard, cost-effective choice. For roofs and balconies exposed to sun and movement, a liquid-applied polyurethane membrane performs better long term.
Step-by-Step: How to Waterproof a Wet Area Correctly
Skipping steps is how a good product still fails. Follow this sequence every time, regardless of which membrane you are using.
| Step | What to Do |
|---|---|
| 1 | Prepare the surface: clean, remove dust and laitance, repair honeycombing |
| 2 | Form a fillet (cove) at every wall-to-floor and wall-to-wall corner |
| 3 | Apply the first coat of membrane across the full floor and up the walls |
| 4 | Reinforce corners, pipe penetrations and joints with membrane tape or mesh |
| 5 | Apply the second coat in the opposite direction to the first for full coverage |
| 6 | Allow full curing, then flood test the floor for 24 to 48 hours |
| 7 | Lay the protection screed once the flood test passes with no leaks |
| 8 | Proceed to tiling only after the screed has cured |
In simple terms, the flood test is non-negotiable. It is the only way to confirm the membrane works before it gets buried under tiles where a leak becomes expensive to trace.
How Much Waterproofing Material You Need on Site
Under-ordering waterproofing material is a common site headache, usually because coverage rates are read off the tin without accounting for the second coat, the wall upturn, or wastage on a rough substrate. Budget generously, because a thin, patchy coat is worse than no coat at all.
| Material | Typical Coverage (2 coats) | Notes |
|---|---|---|
| Cementitious coating | 1.0 to 1.5 kg per square metre | Add 10 to 15 percent for wall upturns and rough surfaces |
| Liquid-applied membrane | 1.5 to 2.0 litres per square metre | Higher on exposed roofs due to UV-resistant top coat |
| Sheet membrane | Per roll width, plus 100mm overlap at joints | Order extra for laps and detailing around penetrations |
On a typical Kenyan residential bathroom of about 4 to 6 square metres including wall upturns, that works out to roughly one 20kg bag of cementitious waterproofing per bathroom, with some left over for touch-ups. Always confirm against the specific product data sheet before ordering for a full project.
Common Mistakes That Cause Leaks Later
Most waterproofing complaints trace back to a short list of repeated mistakes on site. Watch for these on every job.
Tiling before the membrane and screed have fully cured is the most common one, usually because the programme is behind and the site team rushes ahead. Skipping the flood test is another, because it feels like a delay when in fact it saves weeks of rework later. Pipe penetrations for the shower mixer, floor drain and water inlet are also frequently left untreated, and that is exactly where water finds its way in first. Finally, not extending the membrane high enough up the wall inside a shower area leaves a gap that splashing water eventually exploits. Mixing incompatible products from different manufacturers is another quiet cause of failure, since bond strength between layers is not guaranteed unless it is one tested system. And a floor with no fall towards the drain lets water pond instead of draining away, which stresses the membrane over time even if it was installed correctly.
What the Codes and Standards Say
Waterproofing in Kenya is guided by the National Building Code (formerly Kenya Building Code, Cap 296), which requires damp proofing and waterproofing detailing for wet areas and structures in contact with the ground. NCA-registered contractors are expected to specify and install waterproofing systems in line with manufacturer data sheets and recognized standards.
For liquid-applied membranes used beneath ceramic tiling, BS EN 14891 sets the performance requirements for water tightness and bond strength. For basements and below-ground water tanks, BS 8102 covers protection against water from the ground. A site engineer or clerk of works should confirm the specified system meets the relevant standard before work is covered up.
Frequently Asked Questions
Q: How long should waterproofing cure before tiling?
Most cementitious and liquid-applied systems need 24 to 48 hours to cure between coats and before the flood test, then a further curing period for the protection screed, typically 3 to 7 days depending on the product data sheet. Always check the manufacturer’s instructions rather than assuming a standard timeline, since curing time changes with humidity and temperature on site.
Q: Do I need to waterproof a kitchen floor, not just the bathroom?
Yes. Kitchens have sinks, water connections and frequent spillage, which makes them a wet area by definition. Skipping waterproofing here is one of the most common causes of hidden water damage in residential buildings, because it is rarely inspected once tiling is complete. The same logic applies to laundry areas and any room with a floor drain, even if it is not officially labeled a wet area on the architectural drawing.
Q: What is a flood test and why is it necessary?
A flood test involves blocking the floor drain, filling the wet area with water to a set depth, and leaving it for 24 to 48 hours to confirm there is no seepage into the slab below. It is the only reliable way to verify the membrane works before it gets covered by screed and tiles, where a failure becomes far more expensive to fix.
The Takeaway
Waterproofing wet areas is not the place to cut corners or rush the programme. The truth is, a membrane that costs a fraction of the tiling budget is what protects the entire finish above and below it. This is a job for the whole site team, not just the mason applying the coat. The architect specifies it, the QS budgets for it properly, the site supervisor enforces the flood test, and the mason executes it with care. Follow the sequence, respect the cure times, run the flood test, and reference the correct standard for the system you are using. Get this right once, and you will not be back on that site two years later chasing a leak.
Want more practical construction knowledge delivered directly to you?
Subscribe to our YouTube channel: https://www.youtube.com/@TheCivilEngineeringHub-001
PS: Join our engineering WhatsApp community for daily learning at +254731393520