

Cracked tiles are one of the most expensive finishing defects on a Kenyan site, because they usually show up weeks after the client has moved in. By then the mason has left, the contractor has been paid, and nobody wants to own the problem.
The truth is, tiles rarely crack because of the tile itself. They crack because of what is underneath them, how they were bonded, or because the building was never given room to move. In simple terms, a tile cracks when stress has nowhere else to go.
This guide is for masons, tilers, site supervisors, engineers and architects who want to stop callbacks before they start. We will walk through the real causes, the site checks that catch them early, and the correct method to prevent each one.
Quick Answer: Tiles crack mainly because of an unstable or poorly cured substrate, hollow spots from poor adhesive coverage, and missing movement joints. Prevent it by curing and levelling the screed properly, fully bedding every tile, and following BS 5385-3 movement joint rules.
What are the main causes of cracked tiles on site?
Almost every cracked tile traces back to one of five root causes. Knowing which one you are dealing with decides the repair, so do not just replace the tile and hope.
| Cause | What you see on site | Who usually owns the fault |
|---|---|---|
| Substrate movement or settlement | Crack follows a line through tiles and screed, often along a wall or beam | Engineer, contractor |
| Screed not cured or too wet | Random hairline cracks and tiles lifting within months | Mason, site supervisor |
| Hollow tiles (poor adhesive coverage) | Hollow sound when tapped, cracks form where a heavy load lands | Tiler |
| No movement joints | Tiles tent upward or crack across large floor areas | Architect, tiler |
| Wrong adhesive or wrong tile for the use | Tiles debond on terraces, or crack under point loads | Specifier, tiler |
Why does the substrate decide whether a tile survives?
A tile is a hard, brittle skin. It has almost no ability to bend, so it depends completely on the layer below being stable, flat and dry.
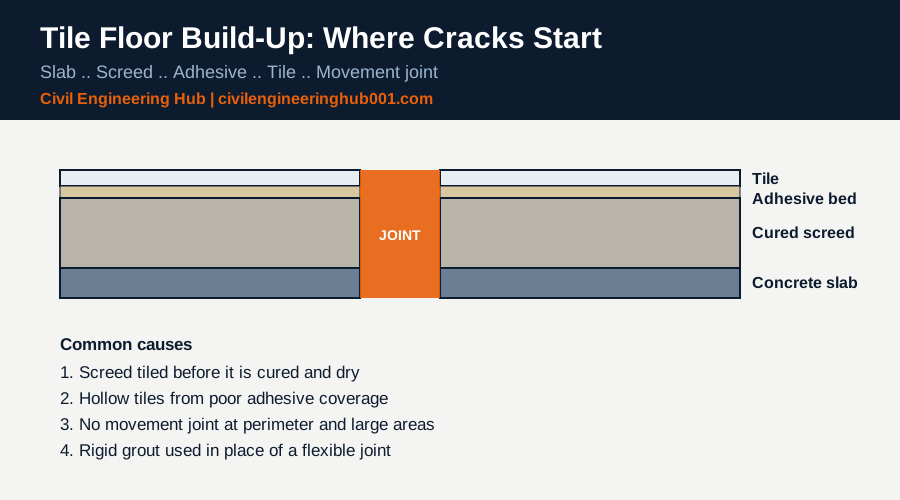
On many Kenyan sites the screed is laid and tiled within a few days to save time. That is where trouble starts, because a cement and sand screed shrinks as it dries. If tiles are bonded on top of it too early, the screed keeps shrinking underneath and pulls the tile layer apart.
As a working guide, a normal sand and cement screed needs roughly one day of drying per millimetre of thickness up to about 50 mm, and clearly longer beyond that. Many specifiers also ask for a minimum of 28 days before heavy tile bonding, especially in damp conditions or when the slab was poured recently.
How do you check the floor is ready before laying tiles?
A five minute check before the first tile goes down saves a week of rework. Do these checks every time, and let the supervisor sign them off.
| Step | Check | Acceptable result |
|---|---|---|
| 1 | Flatness with a 2 m straight edge | Not more than about 3 mm gap under the straight edge |
| 2 | Tap test for hollow screed | Solid sound across the whole area, no drummy patches |
| 3 | Surface strength and dust | No loose sand, no powdery surface, swept and primed |
| 4 | Moisture and age of screed | Dry to the touch, cured as specified, no damp patches |
| 5 | Cracks in the base | Existing cracks investigated and treated before tiling |
Honestly, step four is the one most sites skip. If you tape a clear plastic sheet to the screed for 24 hours and find condensation underneath, the floor is not ready.
How does adhesive coverage cause tiles to crack?
A tile that is bonded only at the corners and centre is basically a small bridge. When someone walks on it, or a table leg lands in the empty space, the tile snaps.
BS 5385-3 asks for full bedding on floors, and the usual site target is close to 100 percent coverage, especially for large tiles and heavy traffic areas. Dot and dab bedding is acceptable for some wall work, but it is a common cause of hollow floor tiles.
The fix is simple but needs discipline. Use a notched trowel sized to the tile, comb the adhesive in one direction, and back butter the tile when it is larger than about 300 mm. Then lift one tile now and then to check the adhesive imprint.
Where do movement joints go, and why do they matter?
Concrete, screed, tiles and adhesive all expand and shrink at different rates with heat and moisture. Without joints, that movement builds up until the weakest thing breaks, and the weakest thing is usually the tile.
BS 5385-3 gives guidance on movement joints for floors. In practice, designers often place joints at about 8 to 10 m spacing inside, and closer, around 4 to 5 m, outdoors or in areas with direct sun such as terraces and verandas. Joints must also sit at room perimeters, at changes of substrate, and over any structural movement joint in the slab.
| Location | Joint type | Typical practice |
|---|---|---|
| Wall to floor junction | Perimeter soft joint | Flexible sealant, about 5 to 10 mm gap, no grout |
| Large internal floors | Intermediate movement joint | About every 8 to 10 m, or as the architect details |
| Terraces and balconies | Intermediate movement joint | About every 4 to 5 m, aligned with panel layout |
| Over structural joints | Continuous movement joint | Must run straight through screed and tile, never bridged |
One site mistake needs a special mention. Grout is not a movement joint. If a joint is filled with rigid cement grout, it stops working and the tiles beside it crack instead.
How should you repair cracked tiles without repeating the failure?
Start by finding out why the tile cracked. A single tile cracked by a dropped tool is a simple replacement. A line of cracks across several tiles is a warning sign, and it needs the supervisor or engineer to look at the base before anyone touches a trowel.
For a straightforward replacement, follow this order on site:
- Cut out the grout around the damaged tile with a grout saw, taking care not to chip the neighbours.
- Break the tile from the centre outwards and remove the pieces, then chip out the old adhesive down to a clean, sound base.
- Check the base for hollow spots or cracks, and repair them with a suitable repair mortar before bedding anything new.
- Bed the new tile with full adhesive coverage, set it level with its neighbours, and leave the joints open to the right width.
- Grout after the adhesive has cured, and keep traffic off the area for the time stated on the data sheet.
Keep a few spare tiles from the same batch at handover. Colour and size vary between batches, and a mismatched replacement looks like a defect even when it is sound.
Which adhesive, tile and detailing choices prevent cracking?
Using ordinary cement mortar for everything is a habit that costs money. Modern polymer modified adhesives classified under BS EN 12004 (C1, C2, and the S1 deformable types) are designed to handle bond and movement better, especially for porcelain and large format tiles.
In Kenya, always confirm the product carries a recognised standard mark, and check KEBS approval where it applies. Under NCA expectations, the supervisor should also keep the data sheet on file for the job.
| Situation | Better choice | Why it helps |
|---|---|---|
| Porcelain or large format tiles | C2 adhesive, full back buttering | Higher bond strength, no hollow spots |
| External terraces | S1 flexible adhesive and flexible grout | Takes thermal movement and wetting cycles |
| Wet areas | Approved waterproofing and waterproof adhesive | Stops water softening the screed beneath |
| Heavy traffic or point loads | Thicker tile, even bedding, hard screed | Spreads load so the tile does not snap |
Also keep grout joints open enough, at least 2 to 3 mm for most floor tiles, so tiles are not rubbing edge to edge. Tight, hairline joints are a quiet cause of corner chipping and cracks.
Frequently Asked Questions
Q: Can I tile on a screed that was laid last week?
Usually not. A fresh sand and cement screed is still shrinking, and tiles bonded on it early often crack or lift. Wait for the screed to cure and dry as specified, and test for moisture before you start. If the programme is tight, ask the engineer about a fast drying screed instead of cutting the curing time.
Q: How do I know if a tile is hollow without lifting it?
Tap it gently with a hard object such as a trowel handle. A solid tile gives a sharp, short sound, while a hollow one gives a dull drumming sound. Mark hollow tiles and lift a few to see the adhesive pattern. If many are hollow, the coverage method is wrong and needs correcting.
Q: Is it enough to fill a cracked tile with silicone or epoxy?
Only when the cause is a minor impact. If the crack follows a line or keeps returning, the base is moving or the joints are missing. Treat the cause first, then replace the tile. Otherwise the new tile will crack in the same place.
Conclusion
Preventing cracked tiles is mostly about discipline before the first tile is laid. Cure the screed, check the flatness, fully bed every tile, and put movement joints where the standard and the architect say they belong.
The mason, the supervisor, the engineer and the architect each own a piece of this. When all four do their part, the callbacks stop, and your name on the job means something.
Want more practical construction knowledge delivered directly to you?
Subscribe to our YouTube channel: https://www.youtube.com/@TheCivilEngineeringHub-001
PS: Join our engineering WhatsApp community for daily learning at +254731393520