 Civil


A drain pipe laid too flat blocks. A drain pipe laid too steep leaves solids behind. Both failures show up months after the trench is backfilled, when the fix means breaking out the ground and the finishes above it.
So what slope should drainage pipes have? In simple terms, a 100mm foul drain is normally laid at about 1 in 40 (2.5%), with 1 in 80 as the absolute minimum, while a 150mm drain is laid at about 1 in 60 with 1 in 150 as the minimum. These gradients keep the flow fast enough to carry solids away without stranding them.
This guide is for the whole site team. Plumbers lay the pipes, masons build the manholes and benching, supervisors check the levels, engineers design the system, and quantity surveyors measure it. Everyone needs to understand why the gradient matters and how to check it before the trench is closed.
Quick Answer: Lay a 100mm foul drain at 1 in 40 (25mm fall per metre) and never flatter than 1 in 80, and lay a 150mm drain at 1 in 60 and never flatter than 1 in 150, so that flow stays between roughly 0.75 and 3 m/s and carries solids away.
Why does the slope of a drainage pipe matter so much?
A foul drain is not a pressurised pipe. It relies on gravity, so the slope decides how fast the water moves, and the speed decides whether solids travel or settle.
The truth is, water alone will run down almost any slope. The problem is the solids. If velocity drops below about 0.75 m/s at normal flow, paper and solids settle and build up until the pipe blocks. If velocity goes above about 3 m/s, the water outruns the solids and leaves them stranded in the pipe.
BS EN 752 and BS EN 12056 guide drainage design, and the Kenya Building Code requires drains to be laid to falls that give self cleansing flow. The table below converts common gradients into the fall you actually set on site.
| Gradient | Percentage | Fall per metre | Fall over 10 m |
|---|---|---|---|
| 1 in 40 | 2.50% | 25 mm | 250 mm |
| 1 in 60 | 1.67% | 17 mm | 167 mm |
| 1 in 80 | 1.25% | 12.5 mm | 125 mm |
| 1 in 100 | 1.00% | 10 mm | 100 mm |
| 1 in 150 | 0.67% | 6.7 mm | 67 mm |
Honestly, this table is worth printing and pinning in the site office. Most gradient mistakes come from people guessing the fall by eye.
What gradient should you use for each pipe size?
Larger pipes can run flatter because a bigger pipe carries more water at a given slope, and more water means better flushing of solids. Smaller pipes need more fall to keep up the same speed.
Use the table below as a guide, and always confirm against the engineer’s drainage drawing and the specification.
| Pipe size | Typical gradient | Minimum gradient | Typical use |
|---|---|---|---|
| 75 mm | 1 in 40 | 1 in 40 | Waste branches from basins and sinks |
| 100 mm | 1 in 40 | 1 in 80 | Foul drain serving one house |
| 150 mm | 1 in 60 | 1 in 150 | Main drain serving several units |
| 225 mm | 1 in 100 | 1 in 200 | Estate branch sewers |
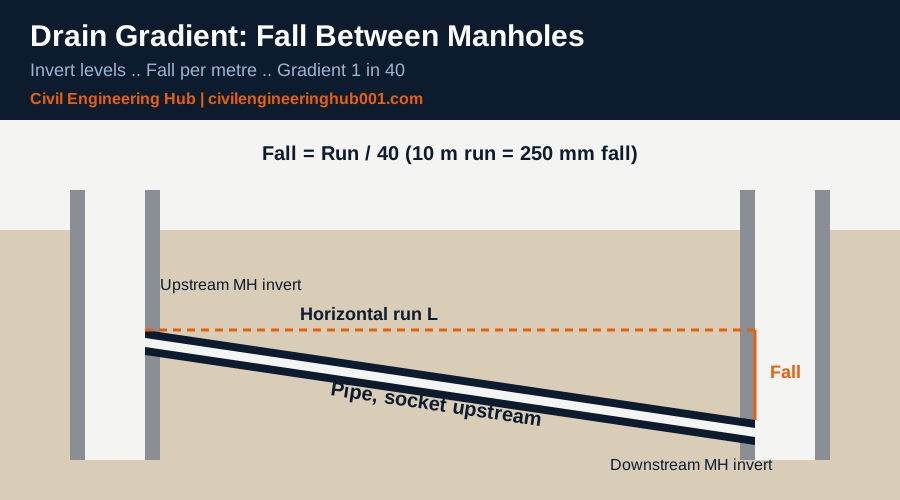
Here is the site reality. On a flat plot in Nairobi or Mombasa, a long run at 1 in 40 quickly eats up depth. A 30 m run drops 750mm, so a drain that starts 600mm below ground ends 1.35m down. That is why the designer sets the invert levels at every manhole, and why the plumber should never reduce the fall just to save excavation.
Steep sites have the opposite problem. Where the ground falls faster than the drain should, the engineer uses a drop manhole so the pipe itself keeps a controlled gradient.
How do you set out and check the gradient on site?
Setting out a drain is a levelling exercise. You work from the invert levels shown on the drainage layout and the manhole schedule, then transfer them into the trench.
The method below works with a dumpy level or a laser level, and it is the same method a supervisor uses to inspect the work.
| Step | Action | Tool |
|---|---|---|
| 1 | Confirm invert levels at each manhole from the drawing | Drainage layout and schedule |
| 2 | Fix a datum or temporary benchmark near the trench | Dumpy or laser level |
| 3 | Set sight rails (profile boards) over the trench at a fixed height above the invert | Timber rails, nails, string line |
| 4 | Use a boning rod of the same height to check the trench formation level | Boning rod |
| 5 | Lay the bedding to level, then lay pipes with sockets facing upstream | Granular bedding, spirit level |
| 6 | Check the finished gradient before backfilling | Level and staff or laser |
Pipes are laid starting at the downstream end and working uphill, with the socket end facing upstream so the spigot of each new pipe enters the socket in the direction of flow. A spirit level on the pipe gives a quick check, but it is not a substitute for the sight rails.
What common mistakes ruin drainage gradients?
Most drainage failures trace back to the same few site errors. They are easy to avoid when the team knows what to watch for.
- Back falls: a single pipe laid with a reverse fall creates a pool that collects solids. Check every joint, not just the ends of the run.
- Soft formation: the trench bottom settles after backfill, especially in black cotton soil, and the gradient is lost. Over excavate and replace with compacted granular fill.
- Poor bedding: pipes resting on lumps of soil or stones sag between supports. Use a uniform granular bed and surround.
- Sudden changes of direction: bends in the middle of a run cause blockages. Put changes of direction at manholes or use long radius bends.
- Disturbed levels: compaction machines, heavy traffic or careless backfilling shift pipes. Backfill in layers and keep plant off the pipe until cover is adequate.
How do testing and records protect the work?
Gradient is only proven when it is tested and recorded. A drain should be tested with either a water test or an air test before backfilling is completed, following the standard in the specification such as BS EN 1610.
| Check | What it proves | Who signs off |
|---|---|---|
| Level check of invert | Gradient matches the drawing | Site engineer or supervisor |
| Water or air test | Joints are watertight | Plumber with the clerk of works |
| CCTV or visual check | No back falls, no debris | Engineer |
For quantity surveyors, the same records support payment. Trench depth, bedding and testing are measured items, and a failed test means rework at the contractor’s cost.
How do Kenyan site conditions change the way you lay drains?
The textbook gradient is the starting point. Site conditions decide how you protect it.
In Nairobi and much of the Rift Valley, black cotton soil swells when wet and shrinks when dry. A drain laid directly on it will move, and a pipe that moves loses its fall. The fix is to excavate below the pipe level, replace the soft material with compacted granular fill, and bed the pipe in that layer.
In coastal areas like Mombasa, a high water table is the main problem. Water in the trench floats empty pipes and softens the bedding. Dewater the trench, lay the pipes quickly, and backfill the same day so the levels are not lost overnight.
On sloping plots in the highlands, erosion and surface runoff can wash out the cover over a shallow drain. Keep to the minimum cover depth in the specification, and use concrete surround where the drain passes under driveways or parking areas.
Whatever the region, three habits protect the gradient: check levels at every pipe length, protect the open trench from rain and traffic, and record the invert at every manhole. These records also protect you if the drain is questioned after handover during the defects liability period.
The NCA and county planning authorities expect drainage to be inspected before it is covered, so book the inspection early instead of waiting for the clerk of works to catch you backfilling.
Frequently Asked Questions
Q: What is the minimum slope for a 100mm sewer pipe?
The accepted minimum for a 100mm foul drain is about 1 in 80, but only where the flow is enough to flush the pipe. For a drain serving a single house, most contractors prefer 1 in 40 because the flow is small and intermittent. Always confirm the figure against the engineer’s drainage drawing and the specification.
Q: Can a drain pipe be too steep?
Yes. When the gradient is much steeper than needed, water runs ahead of the solids and leaves them behind in the pipe. This is why very steep sections are broken up with drop manholes, and why nobody should exaggerate the fall beyond the design just to be safe.
Q: How do I convert a gradient of 1 in 40 into millimetres on site?
Divide 1000 by 40 to get 25mm of fall for every metre of pipe. For a 12 m run, that is 300mm of total fall. Mark this on your sight rails and check it with a level before backfilling, because it is far cheaper to adjust a bed than to reopen a trench.
Conclusion
Drainage gradient is a small number with a big consequence. Get it right and the system runs quietly for decades. Get it wrong and the whole team pays for the repair, from the plumber who relays the pipe to the client who lives with the smell.
Know your gradient table, set your sight rails carefully, bed the pipes properly, and test before you backfill. That discipline is what separates a drain that works from a drain that comes back as a callback.
Want more practical construction knowledge delivered directly to you?
Subscribe to our YouTube channel: https://www.youtube.com/@TheCivilEngineeringHub-001
PS: Join our engineering WhatsApp community for daily learning at +254731393520