 Civil


You walk into a finished room and the first thing you notice is a thin sliver of tile along one wall. Not a crack, not a stain.. just a 20mm strip that makes the whole floor look rushed. The tiles were good and the tiler was careful. The problem started before the first tile touched adhesive: nobody set out the floor.
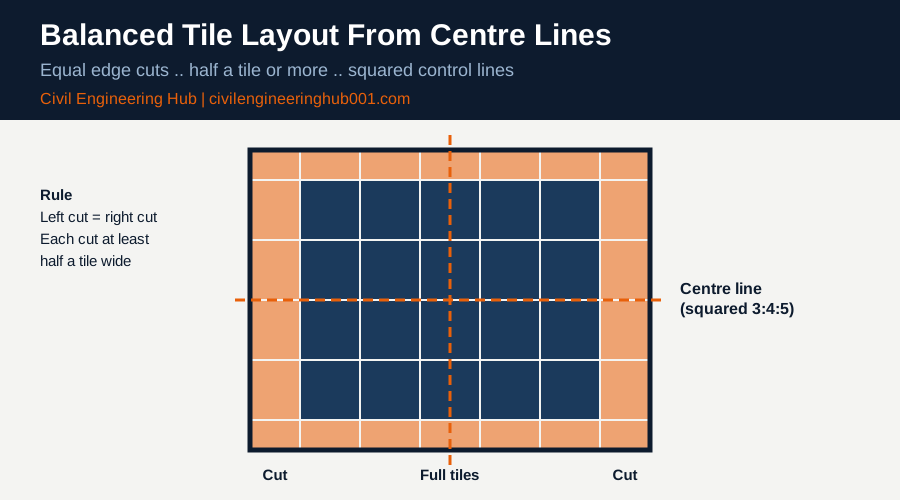
The truth is, setting out is a planning job, not a laying job. You decide where the tiles start so that the cut tiles at both edges are equal and at least half a tile wide. In simple terms, you balance the cuts around the room instead of pushing them into one corner.
This guide shows how to set out floor tiles on Kenyan sites, from finding the true centre of the room to checking doorways, with numbers a site team can use the same day.
Quick Answer: To set out floor tiles without small edge cuts, snap squared centre lines, dry lay a row of tiles with spacers along each line, and shift the start so the cuts at both ends are equal and at least half a tile wide.
Why do small edge cuts happen on so many Kenyan sites?
Most tilers start laying from the door or from the first wall they see. It is quick, but it pushes whatever remainder the room produces against the far wall. If a room is 3,650mm wide and the tile is 600mm, you get six full tiles and a sliver of about 30mm.
Walls in rushed or older buildings are rarely square or parallel, so that sliver also tapers along the wall. The eye picks it up immediately, and no amount of grout hides it.
| Cause | What you see on the floor | Prevention |
|---|---|---|
| Starting from one wall or the door | Thin strip on the opposite wall | Start from centre lines |
| No remainder calculation | Cuts under 50mm that chip and lift | Calculate the edge cut before laying |
| Out of square walls | Cuts that taper along the wall | Work from a squared control line, not the wall |
| Mixed batches or calibres | Joint lines that drift off straight | Check batch and calibre on every box |
Honestly, every one of these is cheap to prevent. They only become expensive once the adhesive has gone off.
How do you find the starting line for a balanced layout?
You work from two centre lines that cross at right angles in the middle of the room. Every tile is then positioned from those lines, not from the walls. BS 5385-3, the code of practice for internal and external floor tiling, expects the setting out to be planned before laying so that the tile pattern is regular and the joints are straight.
On site, the process takes about 30 minutes for a standard room and saves hours of rework.
| Step | Action | Check before moving on |
|---|---|---|
| 1 | Measure the room in both directions at three points each | Note the smallest dimension |
| 2 | Mark the midpoint of opposite walls and snap a chalk line each way | Lines cross near the room centre |
| 3 | Square the lines using the 3:4:5 method | Diagonals from the crossing agree |
| 4 | Dry lay a row of tiles with spacers along each line to the walls | Measure the cut at each end |
| 5 | Shift the line by half a tile if either cut is under half a tile | Re-measure both ends |
| 6 | Fix a straight batten along the final line as your laying guide | Batten is level and secure |
Do not trust the walls to be your guide. On a new building with plaster still wet, a wall can be 10 to 15mm out over a 4m run. The chalk line is your truth, so everything else follows it.
Use the same spacers for the dry lay and the real laying. A 2mm spacer in the dry lay and a 3mm spacer on the floor will move your edge cut by several millimetres over a long room.
What is the 50 percent rule and how do you apply it?
The rule is simple: no edge cut should be narrower than half a tile. A cut below that looks thin, breaks easily during cutting, and is more likely to sound hollow once it dries. You test two options in each direction and pick the one that passes.
The two options are placing a full tile centred on the centre line, or placing a joint on the centre line. Here is a worked example with a 600 x 600mm tile and a 3mm joint, so each tile occupies a pitch of 603mm.
| Direction | Option | Full tiles | Edge cut each side | Decision |
|---|---|---|---|---|
| Width 3,650mm | Tile centred on line | 5 | About 316mm | Accept |
| Width 3,650mm | Joint on line | 6 | About 15mm | Reject |
| Length 4,300mm | Tile centred on line | 7 | About 38mm | Reject |
| Length 4,300mm | Joint on line | 6 | About 340mm | Accept |
Notice that the answer is different in each direction. The width wants a tile on the line and the length wants a joint on the line. That is normal, and it is why you test both options every time.
You calculate the edge cut like this: room dimension minus the space taken by full tiles and joints, divided by two, minus one joint. Write it on the floor with a marker so the whole team sees the plan.
If neither option passes, use a slightly different joint width within what the tile allows, or ask the client to accept a larger perimeter cut hidden under skirting.
How do doorways and visible areas change the layout?
A balanced room is not always the best-looking room. Tiles are seen from the door, so the layout should look right from where people stand and walk. If the room has a wide opening into a corridor, continue the centre line through the doorway so the tile joints run straight from one space to the next.
Cabinets, wardrobes and fixed counters hide the edge cuts beneath them. Put the thinner cuts there and keep the full tiles in the open floor area. A kitchen with base units on two sides is a good example: you can push the cut tiles under the units and keep the visible floor clean.
| Situation | Layout decision |
|---|---|
| Open doorway into corridor | Carry the centre line through and align joints |
| Fixed kitchen units on two sides | Hide the cuts under the units |
| Bathroom with shower tray | Set out from the door so full tiles meet the entry |
| Large living room | Use the main viewing direction as the primary line |
What should you check on site before the adhesive goes down?
Once adhesive is spread, the layout is committed. Spend ten minutes on these checks with the tiler and the supervisor.
- Confirm the screed is flat to the tolerance in the specification and fully cured, as tiling over damp screed causes debonding.
- Check the tile batch number and calibre on every box, and mix tiles from several boxes as you lay.
- Confirm door frame positions and finished floor levels so tiles tuck neatly under architraves.
- Use a cement-based adhesive suited to the tile, such as a C2 class under EN 12004 for porcelain.
- Keep movement joints at the positions shown on the drawings and do not tile across them.
The architect and the QS also have a stake in this. The tile quantity in the BOQ should include the wastage allowance for perimeter cuts, usually 5 to 10 percent depending on the room shape.
Frequently Asked Questions
Q: Should I always start tiling from the centre of the room?
Not always, but centre lines are the safest way to plan the layout. They let you check the cuts on all four sides before committing. After planning, you may start laying from a corner or a doorway, as long as you follow the planned lines.
Q: What is the smallest edge cut that is acceptable?
Aim for at least half a tile, so about 300mm on a 600mm tile. Anything below 100mm is likely to chip, look thin, and fail at the first heavy impact. If the room cannot give you half a tile, adjust the joint width within the tile maker’s limits or move the cut under skirting or fixed units.
Q: Does the joint width change the layout?
Yes, because the joint is part of the tile pitch. A 2mm joint versus a 3mm joint over eight tiles changes the total by 8mm, which can turn an acceptable edge cut into a sliver. Fix the joint width before the dry lay and use the same spacers throughout.
Final takeaway for the site team
A well tiled floor is decided on paper and chalk before it is decided in adhesive. Find the centre lines, test both options in each direction, keep every edge cut at half a tile or more, and hide the thin cuts under fixed items. This is the difference between a floor that looks professional and one that gets snagged on handover.
If you are a tiler, a supervisor, a QS or a young engineer, make the dry lay a standard step on every job. It takes 30 minutes and protects your reputation.
Want more practical construction knowledge delivered directly to you?
Subscribe to our YouTube channel: https://www.youtube.com/@TheCivilEngineeringHub-001
PS: Join our engineering WhatsApp community for daily learning at +254731393520