 Civil


Every straight, plumb and square wall on site starts long before the first brick is laid. It starts with setting out.
In simple terms.. setting out a wall for bricklaying means transferring the wall positions from the drawing onto the ground or slab, using profile boards, string lines, a square corner check and a gauge rod, so every course goes exactly where the architect intended. Get it right and the whole building flows. Get it wrong and every trade after you inherits the mistake.
This guide walks masons, foremen, site engineers and supervisors through the full process, from reading the drawing to laying the first course and checking it against accepted tolerances.
Quick Answer: To set out a wall for bricklaying, fix profile boards outside each corner, stretch string lines to mark the wall faces, check every corner is square with the 3-4-5 method and equal diagonals, then dry-bond the first course and use a gauge rod to control course heights.
Setting Out a Wall Means Turning Drawing Dimensions Into Fixed Lines on Site
The truth is.. most wall problems on Kenyan sites are not caused by bad masonry. They are caused by bad setting out. A wall that is 30mm out of line at the base will stay 30mm out all the way up, and the tiler, carpenter and plumber will all pay for it.
Setting out happens at two levels. The surveyor or site engineer sets the main building lines and grid lines from the site plan. The mason or foreman then sets out individual walls from those grid lines, at foundation level and again on the slab for each floor.
Before touching a peg, the team must agree on three things from the drawings: which face of the wall is the reference line, the wall thickness, and where the openings sit. In Kenya, a 200mm machine-cut stone wall, a 150mm block partition and a 225mm brick wall all set out differently, so confirm the material first.
These are the tools you need on the ground before you start.
| Tool | What It Does on Site | Practical Tip |
|---|---|---|
| Profile boards | Hold the wall lines outside the excavation or work area so lines can be re-strung at any time | Fix them at least 1m clear of the wall so they are not knocked during work |
| String or nylon line | Marks the exact face of the wall between profiles | Use bright nylon line. It stays taut and is easy to see |
| Steel tape (30m) | Measures lengths, offsets and diagonals | Check it against a known length. Old tapes stretch |
| Builder’s square | Gives a quick right-angle check at corners | Confirm with the 3-4-5 method. Wooden squares warp |
| Spirit level and plumb bob | Transfer line positions down to the base and check verticality | Check the level bubble by reversing it end to end |
| Gauge rod (storey rod) | Controls the height of each course and the position of sills, lintels and DPC | Mark it from the section drawing, not from memory |
| Water level or dumpy level | Transfers a common datum around the building | A clear water tube is cheap and accurate for small sites |
Profile Boards and String Lines Are the Backbone of Accurate Wall Setting Out
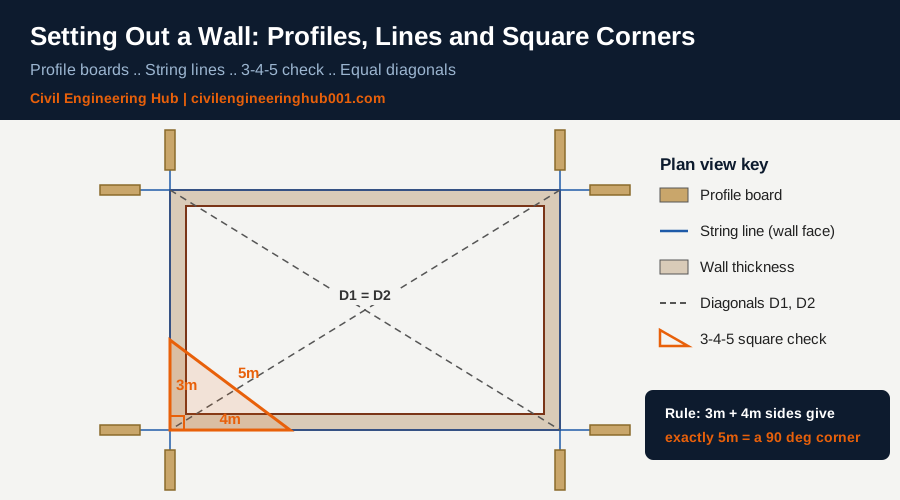
A profile board is a horizontal timber board nailed to two pegs, placed outside each corner of the building. Saw cuts or nails on top of the board mark the wall faces, so a string line between two opposite profiles shows exactly where the wall goes.
The reason profiles matter is simple. Pegs placed at the wall position get removed during excavation. Profiles stay outside the work area, so you can re-string the lines at foundation, at DPC and at slab level without measuring again.
On each profile board, mark four positions for a solid wall: the outer face of the wall, the inner face of the wall, and both edges of the foundation trench. Use a different nail head or paint colour for wall lines and trench lines so the masons do not confuse them.
Honestly.. this is where many young site engineers rush. Fix the profiles level with each other using a water level, brace them, and protect them. A profile board knocked by a wheelbarrow on day three can throw an entire wall out without anyone noticing.
Every Corner Must Be Checked for Square Using the 3-4-5 Rule and Diagonals
A wall can be perfectly straight and still be wrong if the corner is not at 90 degrees. The 3-4-5 rule is the fastest field check, and it comes straight from Pythagoras, so it bridges your maths class and the site directly.
From the corner, measure 3m along one string line and mark it. Measure 4m along the other line and mark it. The distance between the two marks must be exactly 5m. If it is shorter, the angle is less than 90 degrees. If it is longer, the angle is more than 90 degrees. Adjust the second line until you read 5m. On large buildings use multiples such as 6-8-10 or 9-12-15 for better accuracy.
Once all four corners are set, measure both diagonals of the rectangle. For a true rectangle, the two diagonals must be equal. On a typical house footprint, a difference of more than 10mm tells you something is out and must be corrected before any mortar is mixed.
Follow This Step-by-Step Sequence From Drawing to First Course
Here is the full sequence a mason or foreman should follow on a typical Kenyan residential site, whether the walling is machine-cut stone, concrete blocks or clay bricks.
| Step | Activity | Who Is Involved |
|---|---|---|
| 1 | Study the floor plan and wall schedule. Confirm wall thickness, reference faces and opening positions | Site engineer, foreman, mason |
| 2 | Locate grid lines or building lines from the surveyor’s reference pegs | Surveyor or site engineer |
| 3 | Fix and level profile boards outside every corner and wall junction | Foreman, carpenter |
| 4 | Stretch string lines for wall faces and check corners with 3-4-5 and diagonals | Foreman, mason |
| 5 | Transfer the lines down to the foundation or slab using a plumb bob or level, then mark with chalk line | Mason |
| 6 | Mark door openings, wall junctions and service chases on the slab | Mason, plumber, electrician |
| 7 | Dry-bond the first course without mortar to check bond and avoid small cut units | Mason |
| 8 | Build the corners first (racking back), using the gauge rod for course heights | Mason |
| 9 | Stretch a line between corners and lay the infill courses to the line | Mason |
| 10 | Check line, level and plumb after every few courses and before DPC | Foreman, clerk of works |
Step 6 is where the full construction team comes in. When the electrician and plumber see their chases and sleeves marked before walling starts, you avoid hacking new walls later, which weakens the masonry and wastes money.
A Gauge Rod Controls Course Heights, Openings and the DPC Level
Getting the wall in the right place on plan is only half the job. The other half is height. A gauge rod, also called a storey rod, is a straight timber batten marked at every course height from the finished floor level upward.
For example, a 200mm high stone or block unit with a 10mm bed joint gives a course height of 210mm. Mark every 210mm on the rod, then mark the DPC level, window sill level, lintel bearing level and wall plate or ring beam level from the section drawing.
The mason holds the gauge rod against each corner as it rises. This keeps every course level around the building and makes sure sills and lintels land at the right height without thick or thin joints to fix the error. Bed joints should stay close to the 10mm nominal thickness. Joints that swing between 5mm and 25mm are a sign of poor setting out, not good craftsmanship.
Check Your Work Against Accepted Tolerances Before Moving Up
Good setting out is measurable. In Kenya, structural masonry design is moving toward the Eurocodes under the national building code framework, and BS EN 1996-2 (Eurocode 6 Part 2) gives clear execution tolerances. BS 8000-3, the workmanship standard for masonry, is also widely referenced in Kenyan specifications.
| Check | Typical Permitted Deviation | How to Check on Site |
|---|---|---|
| Verticality in any one storey | ±20mm | Spirit level or plumb bob at corners and openings |
| Straightness in any 1m length | ±5mm | 1m straight edge along the wall face |
| Straightness over 10m | ±20mm | String line offset at both ends and midpoint |
| Wall thickness | ±5mm or 5% (whichever is greater) | Tape across the wall at several points |
| Corner squareness (house footprint) | Diagonal difference within about 10mm | Measure both diagonals with steel tape |
Always confirm the project specification, because some clients and consultants set tighter limits than the code. Record your checks in the daily site report so the clerk of works and consultant can see that the walls were verified before the next stage.
Frequently Asked Questions
Q: What is the difference between setting out a building and setting out a wall?
Setting out a building fixes the main grid lines and building outline from the site plan, usually by a surveyor or site engineer. Setting out a wall happens inside that framework, marking the exact faces, openings and junctions of each wall. The mason and foreman normally handle wall setting out. Both must use the same reference lines to avoid errors.
Q: Why should the first course be dry-bonded before laying with mortar?
Dry-bonding lets you see how the units fit between corners and openings before anything is fixed. It shows where cuts will fall so you can shift the bond and avoid small slivers near doors and corners. Small cut units are weak and look poor. It takes ten minutes and saves hours of rework.
Q: Can I set out walls directly on a slab without profile boards?
Yes. On upper floors, walls are usually set out on the slab using grid lines transferred from below, a steel tape and a chalk line. The same rules still apply. Check every corner with the 3-4-5 method and confirm equal diagonals before building.
Conclusion
Setting out is the quiet skill behind every good wall. Profile boards hold your lines, the 3-4-5 rule keeps corners square, the gauge rod controls height, and tolerance checks prove the work is right before anyone builds on it.
Whether you are a mason, a foreman, a site engineer or a student heading for attachment, master this process and you will stand out on any site. Walls that are straight, plumb and square make life easier for the tiler, the carpenter, the plumber and the electrician who come after you. That is what real site professionalism looks like.
Want more practical construction knowledge delivered directly to you?
Subscribe to our YouTube channel: https://www.youtube.com/@TheCivilEngineeringHub-001
PS: Join our engineering WhatsApp community for daily learning at +254731393520